


A small collection: 2015 and beyond
-
brixtertabun
- Posts: 145
- Joined: Mon Mar 14, 2016 6:53 pm
Re: A small collection: 2015 and beyond
I was wondering. Now that you use a clean mineral mix, do you still get overwatering problems? I guess not anymore. So if one was to use a pure mineral mix, is it okay to overpot since it is safer from root rot? Repotting is a chore and I want to avoid it.
-
Steve Johnson
- Posts: 4593
- Joined: Thu Nov 03, 2011 4:44 am
- Location: Los Angeles, CA (Zone 10b)
Re: A small collection: 2015 and beyond
For the sake of clarification -- when I started working with pure mineral mix in 2012, I was aiming for a soil-less mix. That's what I thought I had, but too much DG "play sand" fines I inadvertently left in the mix ended up working against the soil-less idea. This didn't prevent the "dirty" mix from draining freely or drying out properly between waterings, so overwatering was never an issue. Once I discovered that the "dirty" mix impeded optimal root growth of my cacti, I corrected the problem by cleaning up the mix. Moral of the story -- if you're going soil-less (which I highly recommend whenever possible), be sure to rinse the mineral gravel thoroughly so that the airspaces in the mix aren't clogged up by a bunch of fines.brixtertabun wrote: ↑Thu Jul 26, 2018 7:42 pmI was wondering. Now that you use a clean mineral mix, do you still get overwatering problems? I guess not anymore.
Compared to soil-based mixes, rot-prone cacti generally have better long-term survival rates in a pure mineral mix. However, this is not a 100% guarantee. Although many cactus species are capable of growing more extensive root systems in a soil-less mix, severely overpotted plants will be likely to experience root rot regardless of whether or not they're rot-prone by nature. You can get away with overpotting to a certain extent, but it's important to develop a good intuitive feel for this so you don't go too far overboard.brixtertabun wrote: ↑Thu Jul 26, 2018 7:42 pmSo if one was to use a pure mineral mix, is it okay to overpot since it is safer from root rot?
I'm with you on that one -- repotting is a chore. An advantage I found to going soil-less is that I need to repot cacti only if they're on the verge of outgrowing their current pots. And that's a nice problem to have!
If you just want photos without all the blather, please visit my Flickr gallery.
My location: Los Angeles, CA (Zone 10b)
My location: Los Angeles, CA (Zone 10b)
-
brixtertabun
- Posts: 145
- Joined: Mon Mar 14, 2016 6:53 pm
Re: A small collection: 2015 and beyond
Thanks Steve! I will overpot my cacti a bit. Crosses fingers.
-
Steve Johnson
- Posts: 4593
- Joined: Thu Nov 03, 2011 4:44 am
- Location: Los Angeles, CA (Zone 10b)
2017 End-of-summer review (Part 11)
Now for the last 2 December 2013 cacti from Miles' To Go. First up:

Perusing M2G's Mammillaria page, this selection really stood out. And thanks to Cactuspedia's perezdelarosae page, it gave me a heads-up on what the plant would grow into over time. Let the growing begin! At the end of its first summer on the plant bench (9/21/14) and the end of another on 9/20/15:

I wasn't sure if the perezdelarosae could use a deeper pot, but there's only one way to find out -- unpotting the plant on 5/14/16:
Those roots look really good -- the perezdelarosae apparently didn't mind being in "dirty" mineral mix, although as I've said before, clean is always better than dirty. No need to change the pot either, so back in it went. With a potful of clean mix to keep the party going, here's what we have on 5/15, 5/28, and 9/24/16:

Columnar Mamms don't have a woody core, so as they grow, we'll get "the leaning tower of Mammillaria". While my grahamii leans a bit, the perezdelarosae really takes the cake. The angle on the 9/24 photo doesn't do justice to how much it grew that summer, so here's a better angle with this shot leading to some (bad) cactus humor:

The perezdelarosae says to my Gymno stenopleurum, "well, hello beautiful! My, what long spines you have!" The Gymno responds, "you keep growing in my direction, I'll poke you, buddy!"
Okay, Mr. perezdelarosae, how low can you go? Let's find out -- moving onward to 2017, here it is coming out of the plant's winter dormancy (3/25), followed by plumping and growing on 5/28:

Normally I'm not a fan of rotating cacti, but at the rate Mr. perezdelarosae has been growing, I thought it'd be a good idea to point him toward a less "dangerous" direction. The view on 9/29/17:

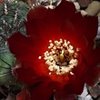
The Melo matanzanus says "oh, great -- now he's bothering me!"
At least from my experience, the species sets buds in December/January, then blooms throughout winter into the beginning of spring. This year, the perezdelarosae set its buds later than usual -- 2/17, and a bud just starting to open on 3/4:

Wasn't able to get most of those 2018 flowers on camera, but here are a couple from 3/27:


I'll devote the rest of this post to...


Arriving with the other M2G cacti on 12/22/13, I was pleasantly surprised by the big, beautiful plant Miles Anderson sent my way. I hadn't tried growing a Discocactus before, and I went into it knowing that Discos have a notorious reputation for being finicky about disturbing their roots when they're transplanted. Conventional wisdom say that it's best to get them in spring so the roots can start establishing right away. Getting one in December? Maybe not the best idea, although compared to the other members of the genus, buenekeri is relatively easy -- worth a shot, anyway. I asked Miles for some advice on how to get my new Disco through winter, and he recommended light watering every 3 weeks to keep the core root system alive until the next growing season kicked in. (This is standard practice not only for Discos, but for Melocactus too.) I've never had much use for conventional wisdom, and thanks to his spot-on guidance, the buenekeri took to its new home rather quickly in the spring of 2014. There's an awful lot going on in that pot, so we'll divide it in 2 for "before-and-after" comparisons on 9/20/14 and 9/24/16:


Wow, I had no idea the buenekeri would offset like that! As much as I loved seeing all the new pups growing in 2015 and '16, I also knew that we might have a problem if I didn't take measures to deal with the overcrowding. I addressed the situation in March 2017, so if you'd like to know what I did, see Discocactus buenekeri gets a haircut. Now we'll see what happened after the "haircut", going from 3/4 to 10/8/17:


Exactly what I was hoping for -- with the excess pups trimmed away, more energy went to the parent stem and the "chief" pup. Since the buenekeri will continue to offset, further haircuts are in its future. Nice thing is that the pups are easy to remove, so when the plant gets another trim, the next group of excess pups will find a good home at Desert Creations in Northridge CA. In the meantime, those post-haircut photos reveal a couple of interesting things. First, we'll notice what appear to be offsets growing around the buenekeri's cephalium. But are they really pups, or are they a stage leading to new cephalium growth? The parent stem looking right at us on 9/1/14 and 10/8/17:

After reviewing a bunch of digital pics on Bing, I'm inclined toward the idea that we're getting to see what the cephalium on a buenekeri looks like as it continues to grow. And second, the "chief" pup may be starting a cephalium of its own. A bird's-eye view of the plant in its full glory on 10/8/17:

Without giving away any hints about what's been going on these days, I'll just say that the buenekeri may blow a few minds when it comes up again in this year's end-of-summer review.
Yeah, I can't believe that we're only 2 months away from seeing the end of another summer. Hopefully I'll be able to finish the 2017 review before I get busy with the camera again, so let's give it the old college try as we forge ahead to the cacti that landed on my bench in 2014.
Perusing M2G's Mammillaria page, this selection really stood out. And thanks to Cactuspedia's perezdelarosae page, it gave me a heads-up on what the plant would grow into over time. Let the growing begin! At the end of its first summer on the plant bench (9/21/14) and the end of another on 9/20/15:
I wasn't sure if the perezdelarosae could use a deeper pot, but there's only one way to find out -- unpotting the plant on 5/14/16:
Those roots look really good -- the perezdelarosae apparently didn't mind being in "dirty" mineral mix, although as I've said before, clean is always better than dirty. No need to change the pot either, so back in it went. With a potful of clean mix to keep the party going, here's what we have on 5/15, 5/28, and 9/24/16:
Columnar Mamms don't have a woody core, so as they grow, we'll get "the leaning tower of Mammillaria". While my grahamii leans a bit, the perezdelarosae really takes the cake. The angle on the 9/24 photo doesn't do justice to how much it grew that summer, so here's a better angle with this shot leading to some (bad) cactus humor:
The perezdelarosae says to my Gymno stenopleurum, "well, hello beautiful! My, what long spines you have!" The Gymno responds, "you keep growing in my direction, I'll poke you, buddy!"
Okay, Mr. perezdelarosae, how low can you go? Let's find out -- moving onward to 2017, here it is coming out of the plant's winter dormancy (3/25), followed by plumping and growing on 5/28:
Normally I'm not a fan of rotating cacti, but at the rate Mr. perezdelarosae has been growing, I thought it'd be a good idea to point him toward a less "dangerous" direction. The view on 9/29/17:
The Melo matanzanus says "oh, great -- now he's bothering me!"
At least from my experience, the species sets buds in December/January, then blooms throughout winter into the beginning of spring. This year, the perezdelarosae set its buds later than usual -- 2/17, and a bud just starting to open on 3/4:
Wasn't able to get most of those 2018 flowers on camera, but here are a couple from 3/27:
I'll devote the rest of this post to...
Arriving with the other M2G cacti on 12/22/13, I was pleasantly surprised by the big, beautiful plant Miles Anderson sent my way. I hadn't tried growing a Discocactus before, and I went into it knowing that Discos have a notorious reputation for being finicky about disturbing their roots when they're transplanted. Conventional wisdom say that it's best to get them in spring so the roots can start establishing right away. Getting one in December? Maybe not the best idea, although compared to the other members of the genus, buenekeri is relatively easy -- worth a shot, anyway. I asked Miles for some advice on how to get my new Disco through winter, and he recommended light watering every 3 weeks to keep the core root system alive until the next growing season kicked in. (This is standard practice not only for Discos, but for Melocactus too.) I've never had much use for conventional wisdom, and thanks to his spot-on guidance, the buenekeri took to its new home rather quickly in the spring of 2014. There's an awful lot going on in that pot, so we'll divide it in 2 for "before-and-after" comparisons on 9/20/14 and 9/24/16:
Wow, I had no idea the buenekeri would offset like that! As much as I loved seeing all the new pups growing in 2015 and '16, I also knew that we might have a problem if I didn't take measures to deal with the overcrowding. I addressed the situation in March 2017, so if you'd like to know what I did, see Discocactus buenekeri gets a haircut. Now we'll see what happened after the "haircut", going from 3/4 to 10/8/17:
Exactly what I was hoping for -- with the excess pups trimmed away, more energy went to the parent stem and the "chief" pup. Since the buenekeri will continue to offset, further haircuts are in its future. Nice thing is that the pups are easy to remove, so when the plant gets another trim, the next group of excess pups will find a good home at Desert Creations in Northridge CA. In the meantime, those post-haircut photos reveal a couple of interesting things. First, we'll notice what appear to be offsets growing around the buenekeri's cephalium. But are they really pups, or are they a stage leading to new cephalium growth? The parent stem looking right at us on 9/1/14 and 10/8/17:
After reviewing a bunch of digital pics on Bing, I'm inclined toward the idea that we're getting to see what the cephalium on a buenekeri looks like as it continues to grow. And second, the "chief" pup may be starting a cephalium of its own. A bird's-eye view of the plant in its full glory on 10/8/17:
Without giving away any hints about what's been going on these days, I'll just say that the buenekeri may blow a few minds when it comes up again in this year's end-of-summer review.
Yeah, I can't believe that we're only 2 months away from seeing the end of another summer. Hopefully I'll be able to finish the 2017 review before I get busy with the camera again, so let's give it the old college try as we forge ahead to the cacti that landed on my bench in 2014.
Last edited by Steve Johnson on Sun Aug 12, 2018 4:33 pm, edited 1 time in total.
If you just want photos without all the blather, please visit my Flickr gallery.
My location: Los Angeles, CA (Zone 10b)
My location: Los Angeles, CA (Zone 10b)
-
Steve Johnson
- Posts: 4593
- Joined: Thu Nov 03, 2011 4:44 am
- Location: Los Angeles, CA (Zone 10b)
2017 End-of-summer review (Part 12)
In Part 10, I did promise y'all a holiday "bonus" plant which arrived at the end of 2013, but I didn't have enough time to include it in my last post. Before we review a couple of cacti I purchased in 2014, I'll lead off today's installment with...
Geohintonia mexicana
Aztekium ritteri has fascinated the heck out of me ever since I saw one at the Huntington's desert collection many years ago. A. ritteri also happens to be the slowest grower in the cactus family, growing at a rate of 1 mm. per year. I call this species the "holy grail" of cactus collecting because it's virtually impossible to find them here in the US. But if you do, you'll be getting a grafted plant. I won't keep grafted cacti in my collection, and while I did try to find ritteri available for sale with its own roots, I gave up on the idea when occasional searches came up empty. (Apparently you'll have better luck with European sources on eBay, although US collectors would be taking an awful chance on buying cacti that way.) Then when Geohintonia mexicana came to my attention, I was intrigued by the facts that A. Geohintonia is closely related to Aztekium (its resemblance to A. hintonii is pretty remarkable), and B. they grow easily on their own roots. I struck pay dirt when I was lucky enough to spot one being offered on eBay through Tee Dee Cacti in Lakeport, CA. There's no way I'd pass up the opportunity, and thanks to a frost-free weather window throughout California that December, my new Geohintonia arrived safe and sound to ring in the new year on 12/30/13. It came as a potted plant, and with the better part of winter still ahead of us, I didn't want to take a chance on repotting the Geohintonia just yet.
In California, February is the coldest month of the year, although coastal SoCal's Februarys tend to be milder than the rest of the state. So it was in 2014, as the growing season started at the beginning of March. Now it's time to see what came out of Tee Dee's nursery pot on 3/15/14:

Composted soil and Perlite -- yeccchhhhh! Maybe fine for Lakeport's hot, dry growing conditions, but here in Casa de Jefferson Park it has to be pure mineral mix. The Geohintonia repotted on 3/18:

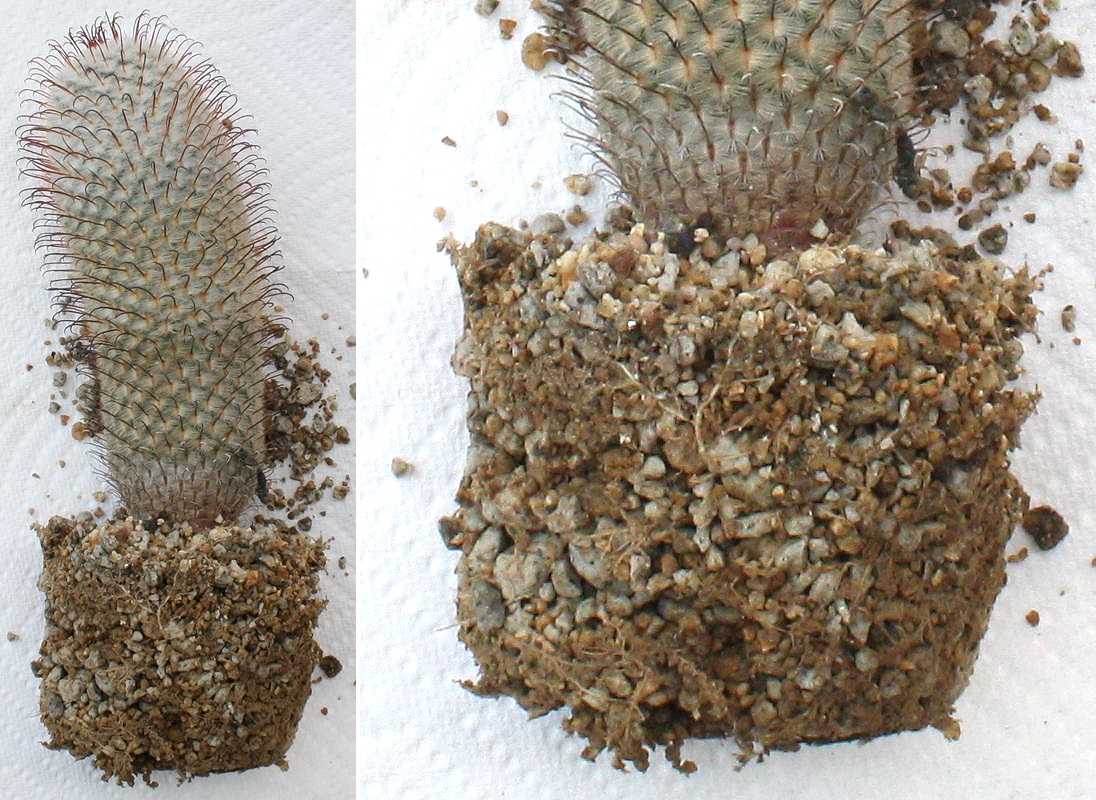
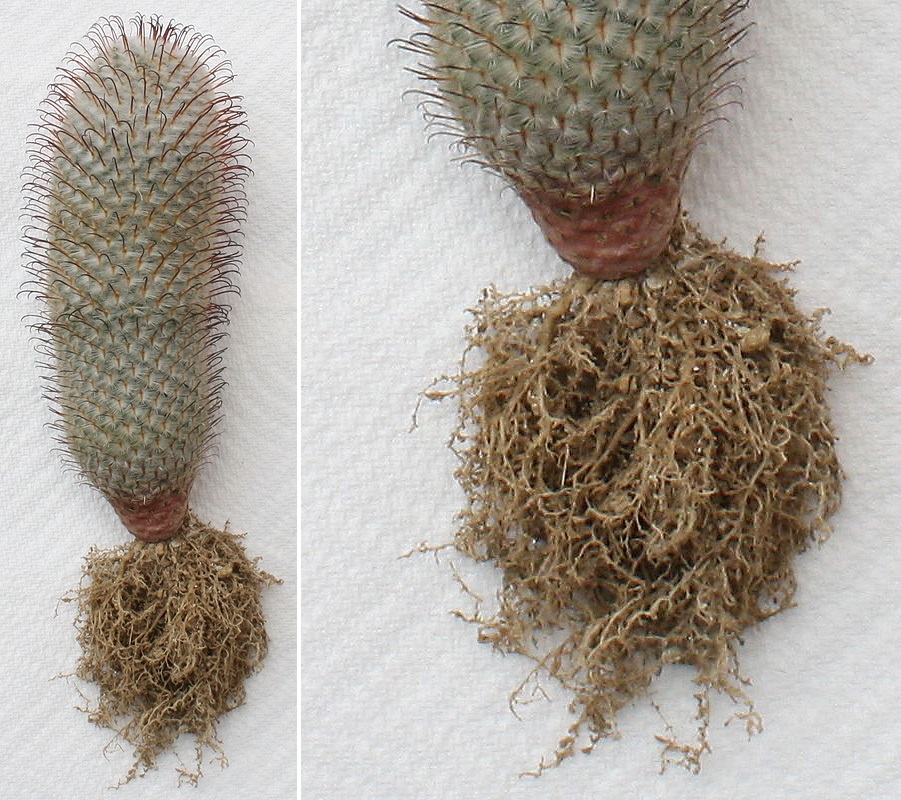
Unfortunately the plant was in "dirty" mix, so we need to clean out the DG fines -- first step, unpot it (5/14/16):
Next, we'll compare the roots on 3/18/14 to what they look like as the plant is about to get repotted again:

Not too bad, and as I've seen in other small pots, the "dirty" mix wasn't all that dirty. However, if the Geohintonia did pretty well before, it should do even better in clean mineral mix. Repotted in a slightly deeper pot on 5/15/16:
Before-and-after photos on 9/21/14, 9/20/15, 9/24/16, and 9/23/17:


Not sure if you agree, but I'd say that the plant's growth is better in clean mineral mix. Something I did notice was the absence of new spines when it was growing in "dirty" mix. This could be merely a coincidence, although I have to wonder if DG fines dirtying up the mix had something to do with it. Since we see that new spines are back, we'll find out if there are more of them as the Geohintonia continues to grow.
P. aselliformis "look-alike"
Look-alike cacti are really interesting when they come from different genera. For example:

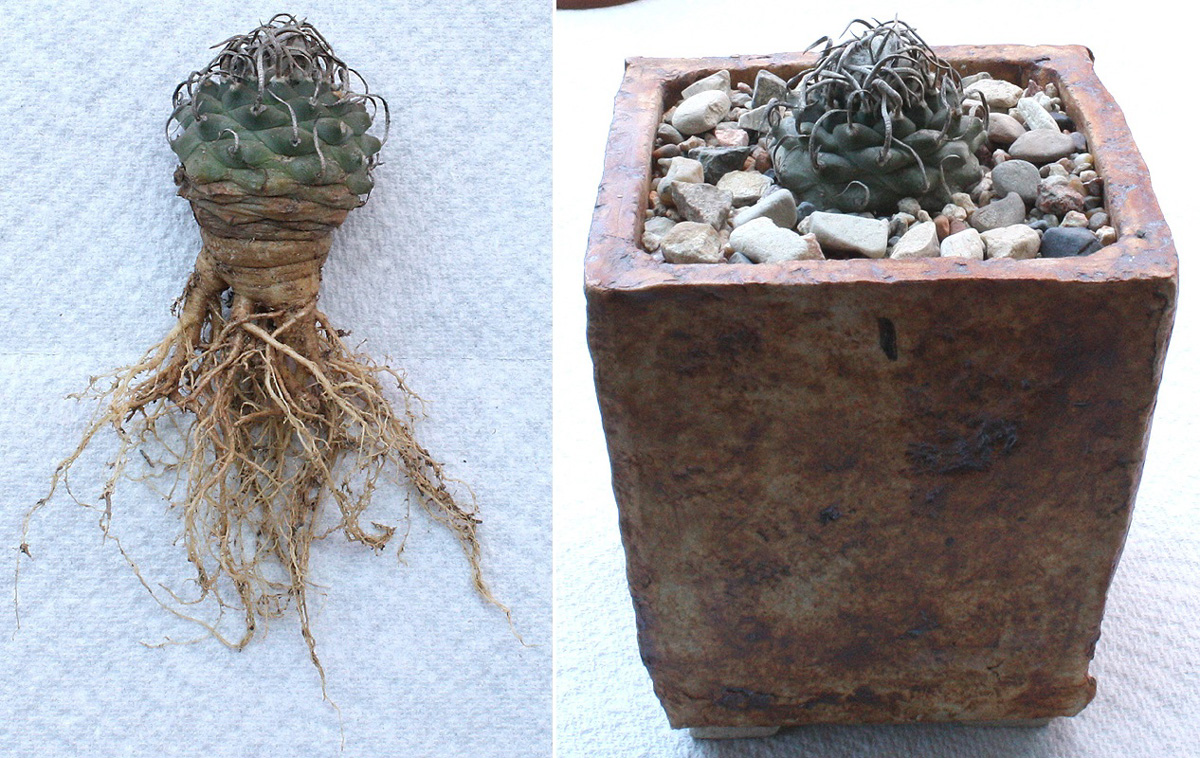
That's Pelecyphora aselliformis on the left. The 4-head P. aselliformis I bought from C and D Plants in May 2013 was a teeny tiny thing, and it's still that way because the species is a very (and I mean very) slow grower. They're also pretty much impossible to find on their own roots, so I wanted a plant that would look like a bigger aselliformis to accompany the one I already have. And there we go -- Turbinicarpus pseudopectinatus on the right. I took advantage of the mild February in 2014 when Planta Seca (Alamo, CA) offered T. pseudopectinatus for sale on eBay -- received and transplanted on 2/23/14:

Quite an attractive little gem, and with a bud that went into bloom too. The only criticism I had was that the seller should've been growing the plant in a deeper pot to accommodate the long taproot. Not the worst thing in the world, though, and I was hoping that the taproot would straighten out and grow down in the glazed ceramic pot I selected. Same dealio as what I did with the Geohintonia -- replacing "dirty" mineral mix with clean mix on 5/15/16:
The taproot was obviously too thick to do any straightening, but at least "dirty" mix didn't prevent the pseudopectinatus from growing new fibrous roots. The current pot's depth looked pretty good, so the pseudopectinatus went right back in with a potful of clean mineral mix:
It's always good to make sure that our cacti are taking up water when they come out of winter dormancy. If the roots of our Turbs are working, they'll give us a quick response to their first drink of the growing season. The pseudopectinatus got it on 3/26/17 -- from winter shriveling (3/17) to spring plumping (4/1):

A before-and-after going from 9/21/14 to 10/8/17:


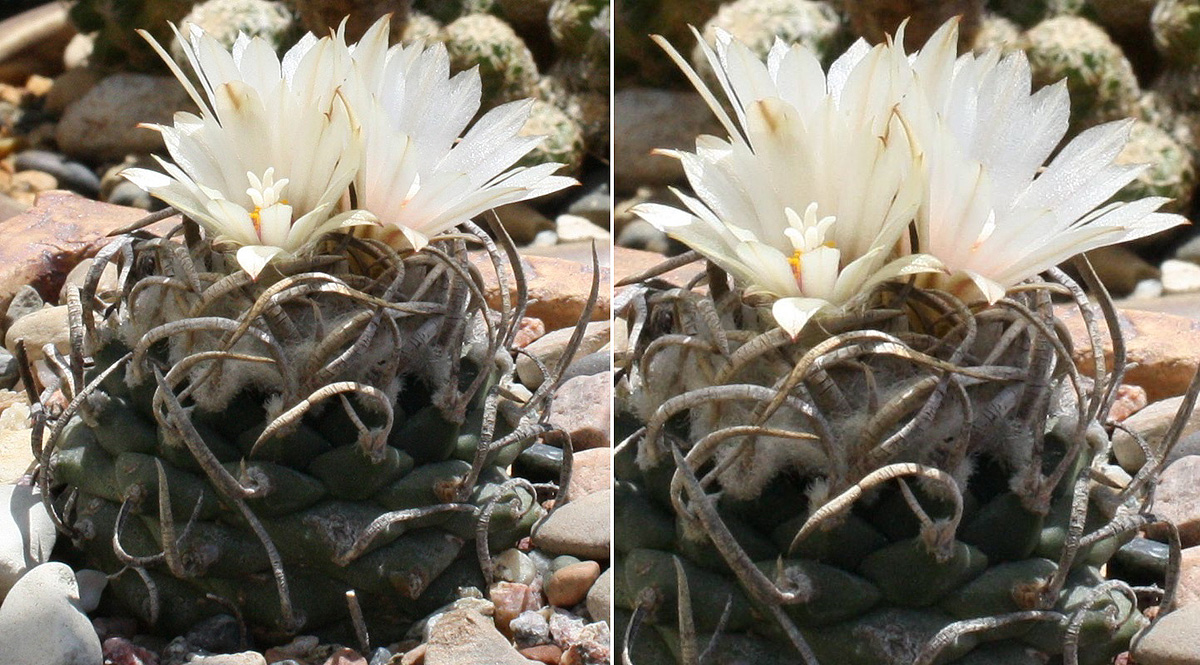
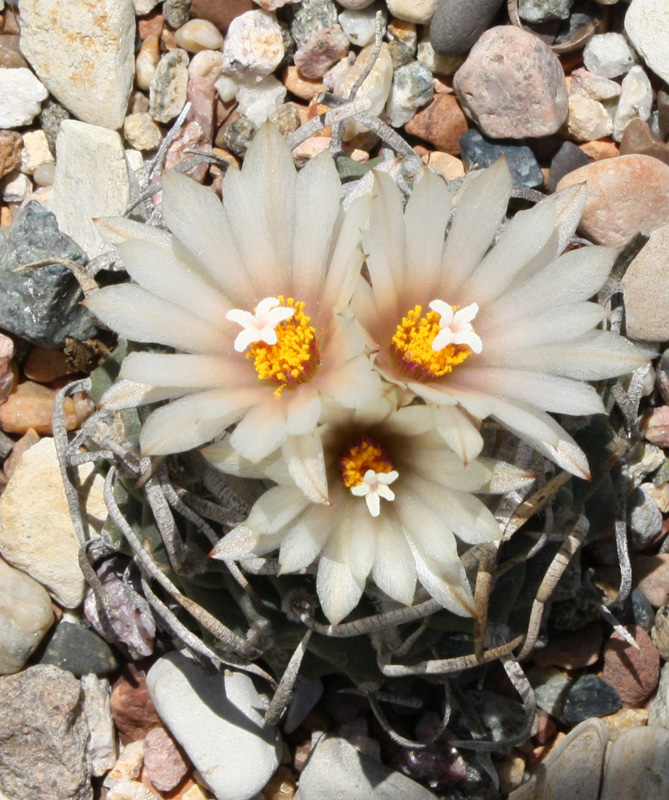
Most of the new growth you see here took place in 2016 and '17. Turbs are slow growers in general, but with that said, I'm rather impressed by the plant's new growth this year. When I photograph the heck out of everything for my 2018 end-of-summer review, the pseudopectinatus will definitely rate a new set of before-and-after shots. In the meantime, the only disappointment I've had was the lack of flowering it usually does in February. The last time we saw my pseudopectinatus in bloom -- 2/27 and 2/28/16:


The plant set buds which aborted in the winters of 2017 and '18. While I don't know what happened in '17, the delayed onset of the winter SoCal just went through might've been enough to upset its normal flowering pattern. That's okay -- as long as the pseudopectinatus is healthy enough to grow, we'll have another shot at more blooms in the next one.
Speaking of C and D...
I love Melocactus, and matanzanus has been my hands-down favorite Melo species ever since I found one at a very unlikely place way back in the 1980s. But Melos definitely aren't for beginners, and I found that out the hard way when I killed a matanzanus I got from the California Cactus Center in 2011. A sadder, but wiser Steve learned from his experience, so I was ready to get back on the saddle and try again. M. matanzanus is a fairly popular species -- I should be able to find one without much trouble, right? Well, the sources I usually go to didn't have any in stock throughout 2013. I knew about C and D Plants through the forum, and since Craig Fry was helpful when he answered my call for P. aselliformis, I contacted him in early 2014 about trying to get a matanzanus. He answered again, but this time it was even better -- "if you'd like to pick up the plant, come down to our place". A bit of a drive going down to Costa Mesa, although not bad, and the trip was sooooo worth it when I spent a wonderful morning with Craig and Denise on 3/15/14.
While I was there for the matanzanus, Craig offered to sell me a Frailea grahliana. The only Frailea I had at the time was the castanea I received from CoronaCactus in 2012, so grahliana would be a great addition -- sold! I usually don't get to inspect the lighting conditions of the sellers I deal with, but here's a rare example pointing out the plant's exact spot in one of Craig's greenhouses:

From C and D's place to mine -- the grahliana potted up on 3/18/14:

Because Fraileas are sun-lovers, I wanted to give my new grahliana as much time under full sun as possible. After a month of the top shelf treatment:

That plant sure looks angry, doesn't it? With the grahliana's first summer under my care, we'll see something quite different -- going from angry and shriveled on 5/26 to plump and beautiful on 9/20/14:

2 nice summers of growth -- 9/20/14 and 9/19/15:


The grahliana was on the verge of outgrowing its pot, so I had to do something about that. Repotting time came on 4/26/16, and we'll see what the roots looked like after 2 years growing in "dirty" mineral mix:
Ooh, better than I expected! However, the plant still needed a potful of clean mix, so the repotting deed was done inside and out:
Now for the results on 9/17/16 and 9/20/17:


Not seen here -- the species is a rather prolific bloomer, so I haven't had any problems on that front. What we do see in the after pics are some new pups growing, but the plant should be plumper. Given how big the grahliana's current pot is, I assumed that deep watering every 2 weeks in spring and summer would be sufficient. Did I make a boo-boo? Yep, I underestimated how thirsty Fraileas are during summertime, so I'm watering it once a week this summer. While the boo-boo was by no means catastrophic, I think underwatering the grahliana over the last couple of summers held it back from reaching its full growth potential. If I'm correct about this, we'll see an improvement when I run a new round of comparison photos for the 2018 review. And yes, I'll include a few marvelous shots of the grahliana in flower.
We've made a lot of headway with the 2017 review, so stay tuned for the next installment coming up soon.
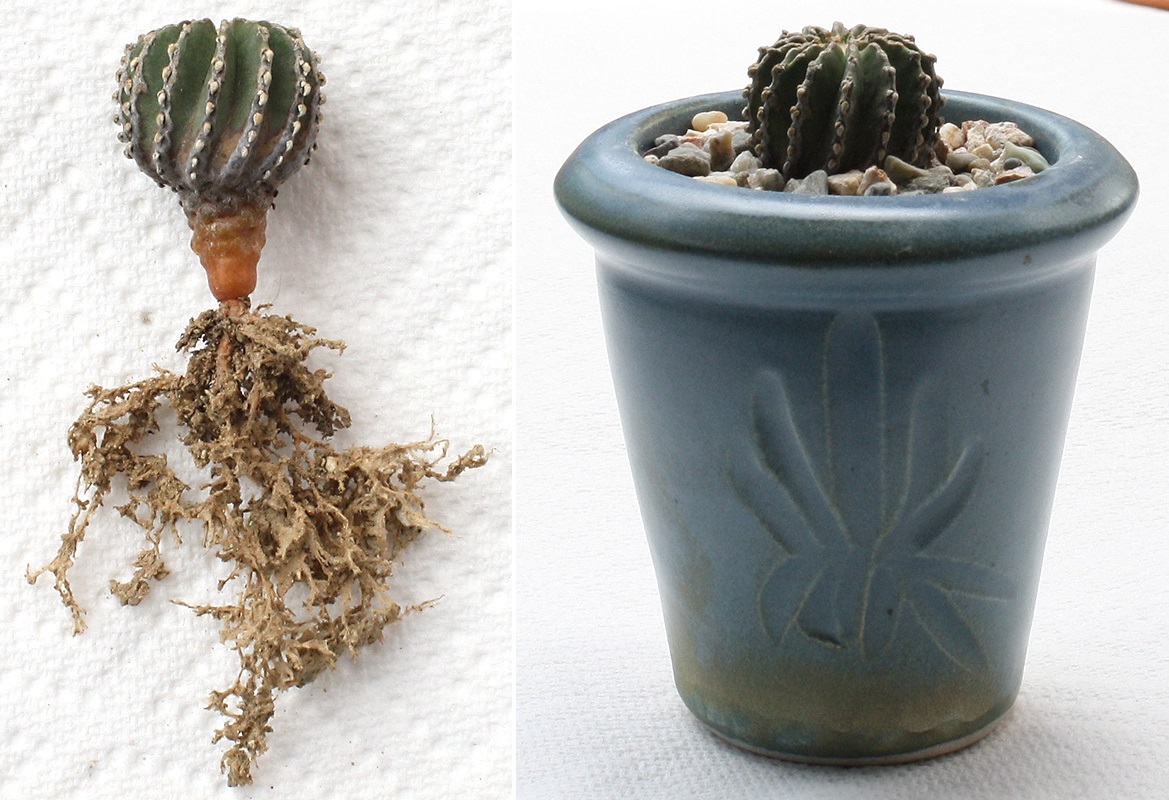
Geohintonia mexicana
Aztekium ritteri has fascinated the heck out of me ever since I saw one at the Huntington's desert collection many years ago. A. ritteri also happens to be the slowest grower in the cactus family, growing at a rate of 1 mm. per year. I call this species the "holy grail" of cactus collecting because it's virtually impossible to find them here in the US. But if you do, you'll be getting a grafted plant. I won't keep grafted cacti in my collection, and while I did try to find ritteri available for sale with its own roots, I gave up on the idea when occasional searches came up empty. (Apparently you'll have better luck with European sources on eBay, although US collectors would be taking an awful chance on buying cacti that way.) Then when Geohintonia mexicana came to my attention, I was intrigued by the facts that A. Geohintonia is closely related to Aztekium (its resemblance to A. hintonii is pretty remarkable), and B. they grow easily on their own roots. I struck pay dirt when I was lucky enough to spot one being offered on eBay through Tee Dee Cacti in Lakeport, CA. There's no way I'd pass up the opportunity, and thanks to a frost-free weather window throughout California that December, my new Geohintonia arrived safe and sound to ring in the new year on 12/30/13. It came as a potted plant, and with the better part of winter still ahead of us, I didn't want to take a chance on repotting the Geohintonia just yet.
In California, February is the coldest month of the year, although coastal SoCal's Februarys tend to be milder than the rest of the state. So it was in 2014, as the growing season started at the beginning of March. Now it's time to see what came out of Tee Dee's nursery pot on 3/15/14:
Composted soil and Perlite -- yeccchhhhh! Maybe fine for Lakeport's hot, dry growing conditions, but here in Casa de Jefferson Park it has to be pure mineral mix. The Geohintonia repotted on 3/18:
Unfortunately the plant was in "dirty" mix, so we need to clean out the DG fines -- first step, unpot it (5/14/16):
Next, we'll compare the roots on 3/18/14 to what they look like as the plant is about to get repotted again:
Not too bad, and as I've seen in other small pots, the "dirty" mix wasn't all that dirty. However, if the Geohintonia did pretty well before, it should do even better in clean mineral mix. Repotted in a slightly deeper pot on 5/15/16:
Before-and-after photos on 9/21/14, 9/20/15, 9/24/16, and 9/23/17:
Not sure if you agree, but I'd say that the plant's growth is better in clean mineral mix. Something I did notice was the absence of new spines when it was growing in "dirty" mix. This could be merely a coincidence, although I have to wonder if DG fines dirtying up the mix had something to do with it. Since we see that new spines are back, we'll find out if there are more of them as the Geohintonia continues to grow.
P. aselliformis "look-alike"
Look-alike cacti are really interesting when they come from different genera. For example:
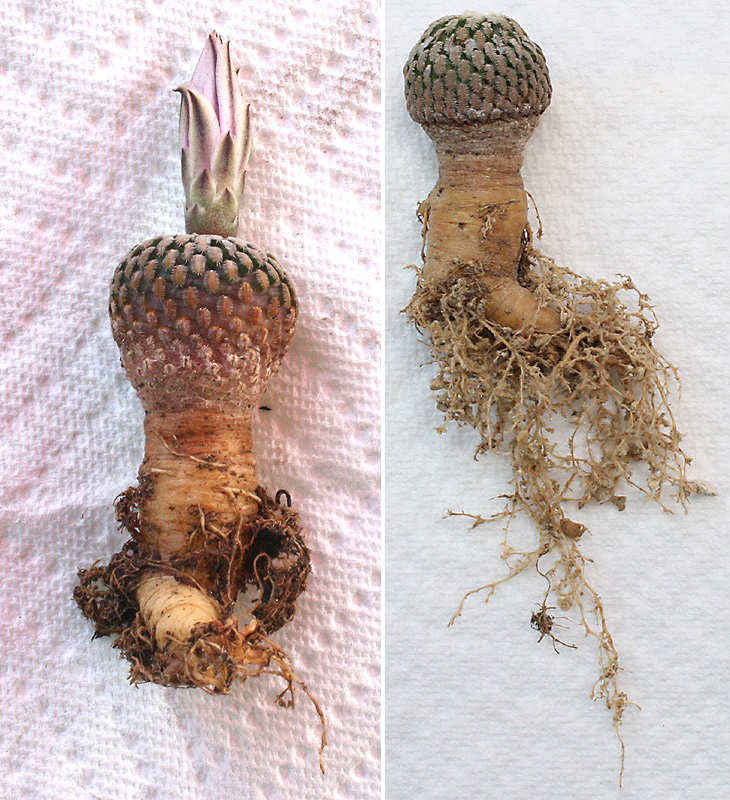
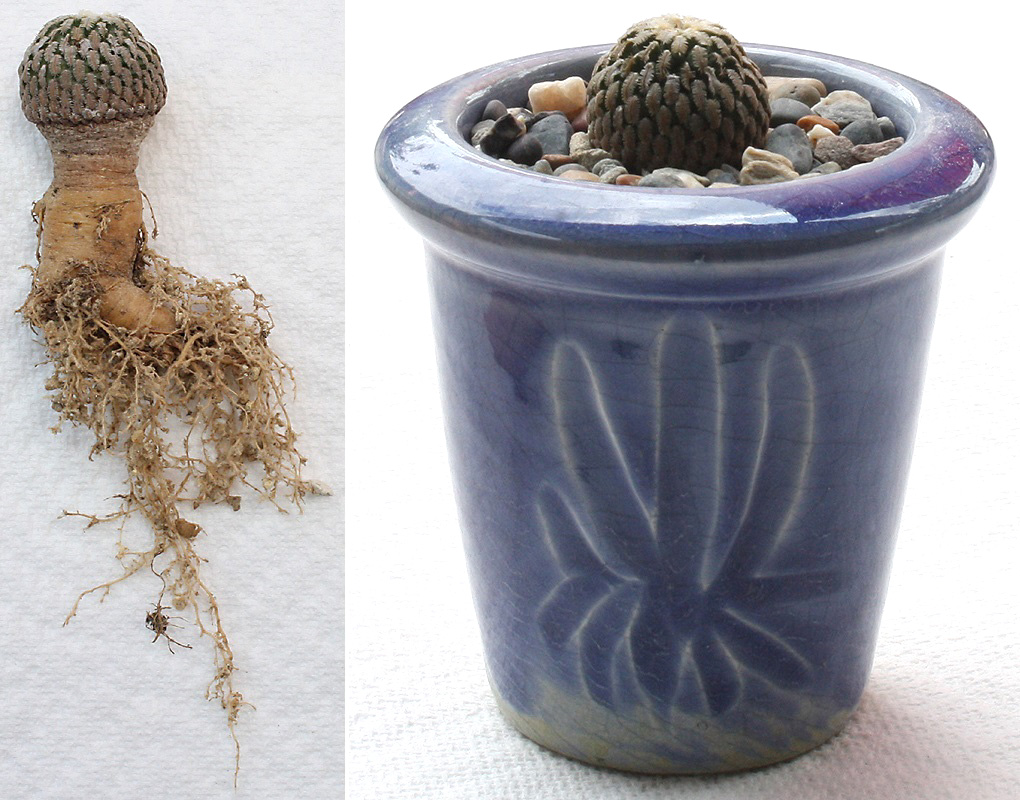
That's Pelecyphora aselliformis on the left. The 4-head P. aselliformis I bought from C and D Plants in May 2013 was a teeny tiny thing, and it's still that way because the species is a very (and I mean very) slow grower. They're also pretty much impossible to find on their own roots, so I wanted a plant that would look like a bigger aselliformis to accompany the one I already have. And there we go -- Turbinicarpus pseudopectinatus on the right. I took advantage of the mild February in 2014 when Planta Seca (Alamo, CA) offered T. pseudopectinatus for sale on eBay -- received and transplanted on 2/23/14:
Quite an attractive little gem, and with a bud that went into bloom too. The only criticism I had was that the seller should've been growing the plant in a deeper pot to accommodate the long taproot. Not the worst thing in the world, though, and I was hoping that the taproot would straighten out and grow down in the glazed ceramic pot I selected. Same dealio as what I did with the Geohintonia -- replacing "dirty" mineral mix with clean mix on 5/15/16:
The taproot was obviously too thick to do any straightening, but at least "dirty" mix didn't prevent the pseudopectinatus from growing new fibrous roots. The current pot's depth looked pretty good, so the pseudopectinatus went right back in with a potful of clean mineral mix:
It's always good to make sure that our cacti are taking up water when they come out of winter dormancy. If the roots of our Turbs are working, they'll give us a quick response to their first drink of the growing season. The pseudopectinatus got it on 3/26/17 -- from winter shriveling (3/17) to spring plumping (4/1):
A before-and-after going from 9/21/14 to 10/8/17:
Most of the new growth you see here took place in 2016 and '17. Turbs are slow growers in general, but with that said, I'm rather impressed by the plant's new growth this year. When I photograph the heck out of everything for my 2018 end-of-summer review, the pseudopectinatus will definitely rate a new set of before-and-after shots. In the meantime, the only disappointment I've had was the lack of flowering it usually does in February. The last time we saw my pseudopectinatus in bloom -- 2/27 and 2/28/16:
The plant set buds which aborted in the winters of 2017 and '18. While I don't know what happened in '17, the delayed onset of the winter SoCal just went through might've been enough to upset its normal flowering pattern. That's okay -- as long as the pseudopectinatus is healthy enough to grow, we'll have another shot at more blooms in the next one.
Speaking of C and D...
I love Melocactus, and matanzanus has been my hands-down favorite Melo species ever since I found one at a very unlikely place way back in the 1980s. But Melos definitely aren't for beginners, and I found that out the hard way when I killed a matanzanus I got from the California Cactus Center in 2011. A sadder, but wiser Steve learned from his experience, so I was ready to get back on the saddle and try again. M. matanzanus is a fairly popular species -- I should be able to find one without much trouble, right? Well, the sources I usually go to didn't have any in stock throughout 2013. I knew about C and D Plants through the forum, and since Craig Fry was helpful when he answered my call for P. aselliformis, I contacted him in early 2014 about trying to get a matanzanus. He answered again, but this time it was even better -- "if you'd like to pick up the plant, come down to our place". A bit of a drive going down to Costa Mesa, although not bad, and the trip was sooooo worth it when I spent a wonderful morning with Craig and Denise on 3/15/14.
While I was there for the matanzanus, Craig offered to sell me a Frailea grahliana. The only Frailea I had at the time was the castanea I received from CoronaCactus in 2012, so grahliana would be a great addition -- sold! I usually don't get to inspect the lighting conditions of the sellers I deal with, but here's a rare example pointing out the plant's exact spot in one of Craig's greenhouses:
From C and D's place to mine -- the grahliana potted up on 3/18/14:
Because Fraileas are sun-lovers, I wanted to give my new grahliana as much time under full sun as possible. After a month of the top shelf treatment:
That plant sure looks angry, doesn't it? With the grahliana's first summer under my care, we'll see something quite different -- going from angry and shriveled on 5/26 to plump and beautiful on 9/20/14:
2 nice summers of growth -- 9/20/14 and 9/19/15:
The grahliana was on the verge of outgrowing its pot, so I had to do something about that. Repotting time came on 4/26/16, and we'll see what the roots looked like after 2 years growing in "dirty" mineral mix:
Ooh, better than I expected! However, the plant still needed a potful of clean mix, so the repotting deed was done inside and out:
Now for the results on 9/17/16 and 9/20/17:
Not seen here -- the species is a rather prolific bloomer, so I haven't had any problems on that front. What we do see in the after pics are some new pups growing, but the plant should be plumper. Given how big the grahliana's current pot is, I assumed that deep watering every 2 weeks in spring and summer would be sufficient. Did I make a boo-boo? Yep, I underestimated how thirsty Fraileas are during summertime, so I'm watering it once a week this summer. While the boo-boo was by no means catastrophic, I think underwatering the grahliana over the last couple of summers held it back from reaching its full growth potential. If I'm correct about this, we'll see an improvement when I run a new round of comparison photos for the 2018 review. And yes, I'll include a few marvelous shots of the grahliana in flower.
We've made a lot of headway with the 2017 review, so stay tuned for the next installment coming up soon.
If you just want photos without all the blather, please visit my Flickr gallery.
My location: Los Angeles, CA (Zone 10b)
My location: Los Angeles, CA (Zone 10b)
-
Steve Johnson
- Posts: 4593
- Joined: Thu Nov 03, 2011 4:44 am
- Location: Los Angeles, CA (Zone 10b)
2017 End-of-summer review (Part 13)
Before we investigate 3 cacti that joined the collection in 2015, I'll complete the (short) list of 2014 arrivals with...

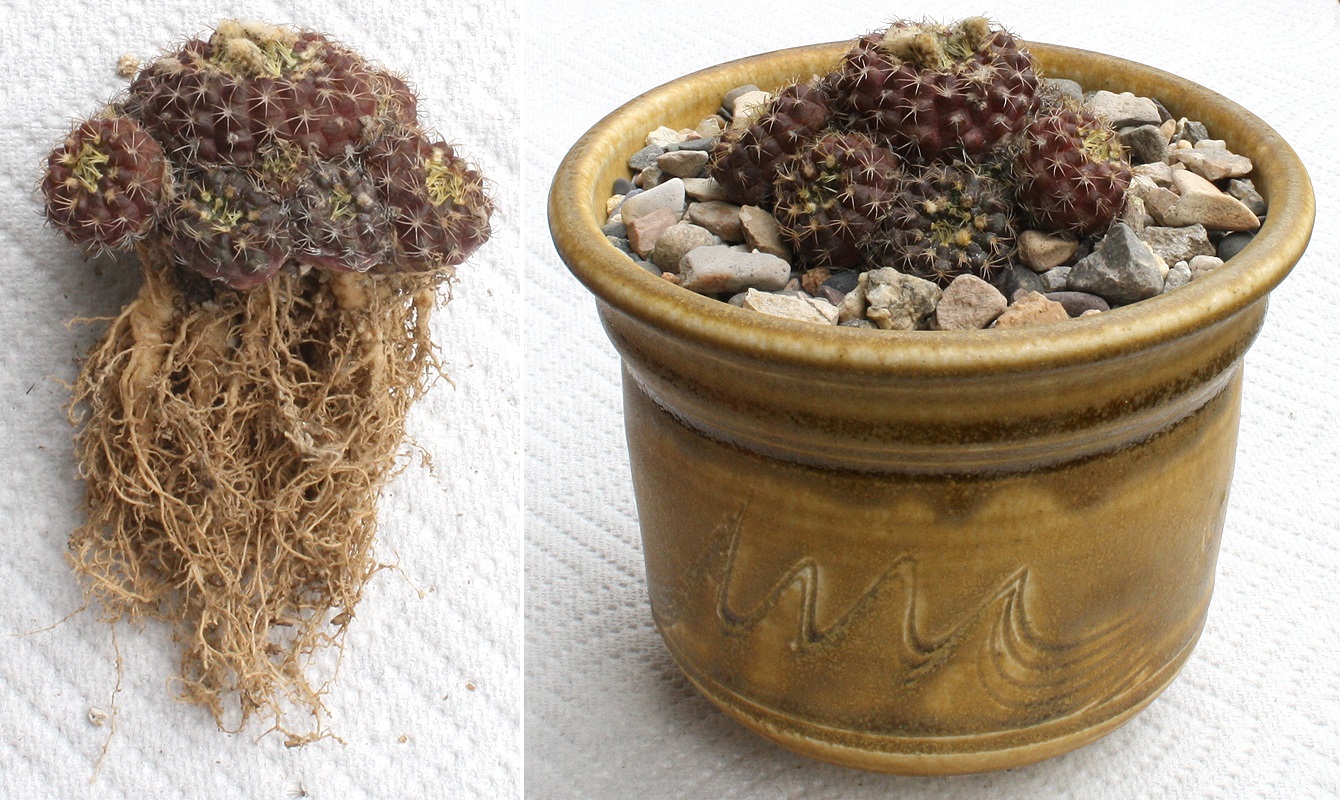
Given this collector's particular fondness for miniatures, anything called "pygmaea" is likely to get my attention. I was on the lookout for a Rebutia to go with my heliosa, and M2G's online inventory of Rebutias made for an easy selection. Here it is settling in on 10/19/14, followed by the plant's 2nd summer under my care on 9/18/16:


The pygmaea came with lovely purple skin that slowly faded when it went from the blazing summertime heat of Arizona to the fairly temperate summers here in semi-coastal L.A. A bit disappointing, but the plant's attractive form and beautiful salmon-orange flowers more than make up for it. And we can't argue with the nice amount of new growth either -- in fact, the pygmaea was ready for a bigger pot, so it was repotting time again on 3/14/17. Since I started the plant in "dirty" mineral mix, we'll compare the roots on its date of arrival (left) with what they looked like coming out of the "dirty" mix (center and right):

Okay, not bad, although intuitive experience told me those roots could be growing a lot better in clean mix. Hitting the pygmaea's "reset button" in its new pot:

If I'm right about better root growth in clean mineral mix, we should see better new growth above-ground too. Now we'll put this to the test -- 3/14 and 10/8/17:

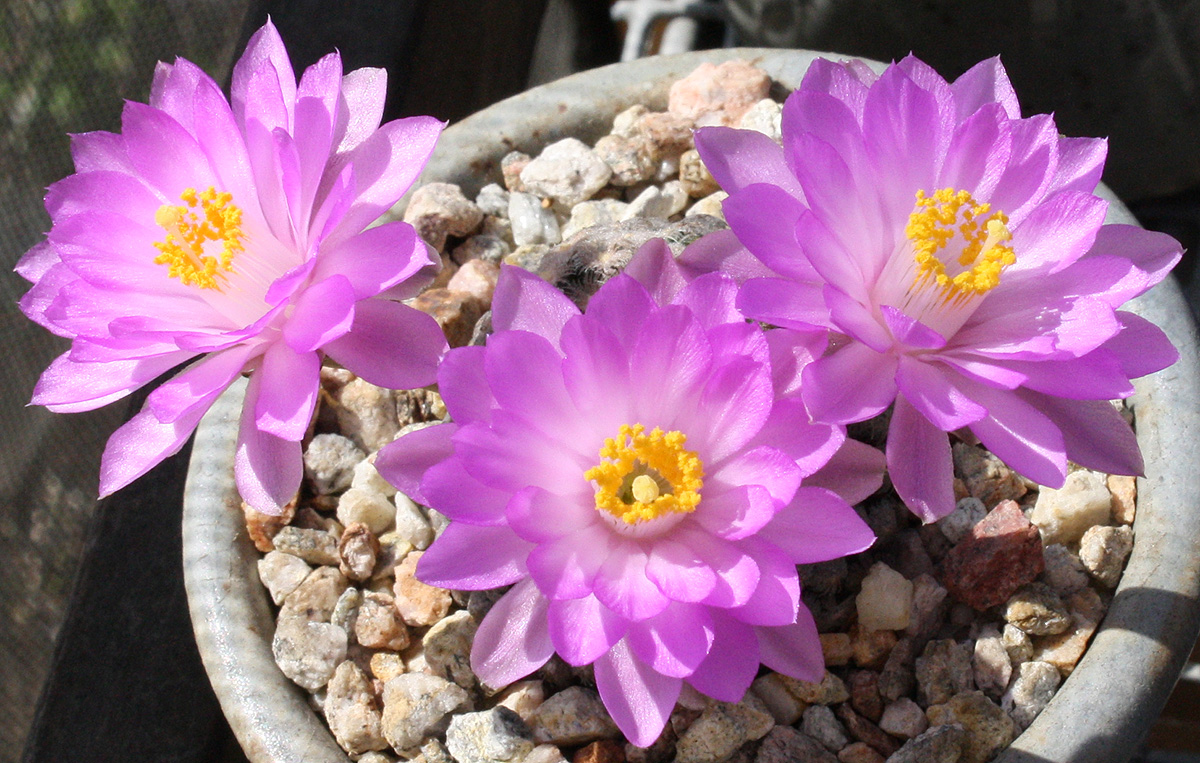
Do we see new pups poking their little heads out? Appears to be 2, but difficult to tell from the side. We'll try a bird's-eye view on 3/14 and 8/6:

Yep, 2 pups. Wait a minute, could there be more? Take the "after", turn it into a "before" and let's find out with an "after" on 10/8/17:

These results are really good, and while the species offsets more slowly than heliosa, new additions should be in the pygmaea's future.
2015 was the year when I started giving new cacti clean mineral mix right from the get-go. All these exhaustive "dirty" vs. clean mix discussions are now behind us (yay!), so the rest of the 2017 review won't be so bloody detailed (double yay!!!). With that in mind, here's a cactus from M2G which graced my collection on 5/16/15:

Cactuspedia has introduced me to lots and lots of interesting, wonderful species over the years. That's how I discovered 2 unusually striking Mamms -- luethyi and theresae. M. luethyi is a very slow grower (the reason why we'll find them only as grafted plants here in US nurseries). Although Miles Anderson had grafted luethyi in stock, the only way I'd buy one would be to degraft it and try to root the scion. IMO theresae is just as pretty, and because they grow well on their own roots, why take the chance on a degraft? Let's watch this gem grow over the course of 3 seasons -- 5/16 and 9/19/15, 9/17/16, and 10/8/17:


Everything about theresae is beautiful -- setting its first buds of 2017 on 4/29 and 5/8:

From bud to bloom on 6/1 and 6/2:
A threefer 2 days later:

M. theresae usually blooms in spring, although it can sometimes flower in summer as well. Here's mine going from buds to blooms on 8/3 and 8/17/17:

Small though it is, I've managed to push the collection's diversity "envelope" as I continue to seek out species I haven't tried growing before. My Tephros represent the Opuntioids, but I thought it might be nice if I found something interesting to represent another Opuntioid tribe. And thanks to Cactuspedia, I did -- Puna clavarioides. What a wonderfully odd, fascinating species, and who wouldn't be intrigued by a cactus called "dead man's fingers"? My talent for selecting difficult-to-find species came into play here, but if you've been in the hobby long enough to know the right people, your persistence usually pays off. In this case, it was Craig Fry of C and D Plants coming through for me again when he offered a few P. clavarioides for sale. I had him choose one for me, and here's what came out of the box on 12/18/15:

Just to give you some perspective, the plant is in a 2-inch (waterproofed) terracotta pot. Craig told me about the difficulty he had getting his clavarioides to root, so I knew I might be in for a challenge. I posted the first signs of progress on the forum in April 2016, prompting a few nice and helpful responses. I'll share that part of the story with you here. The story continued with more progress that summer, and you'll see the update here. Having zero experience with the species, 2 nuggets of info came in quite handy. One was from Dave W (referenced in the first link), as he suggested that when clavarioides is transplanted, it takes a year for the plant to establish its root system before it starts growing above-ground. You are correct, Dave! Then Craig said that new stem growth takes place in summer. Turns out that the clavarioides is actually ahead of schedule -- the view on 3/25 and 4/9/17:

Indeed, that's the beginning of a brand-new stem already! Next, we'll check in on the stem's growth rate -- 4/9, 4/20, and 5/29:
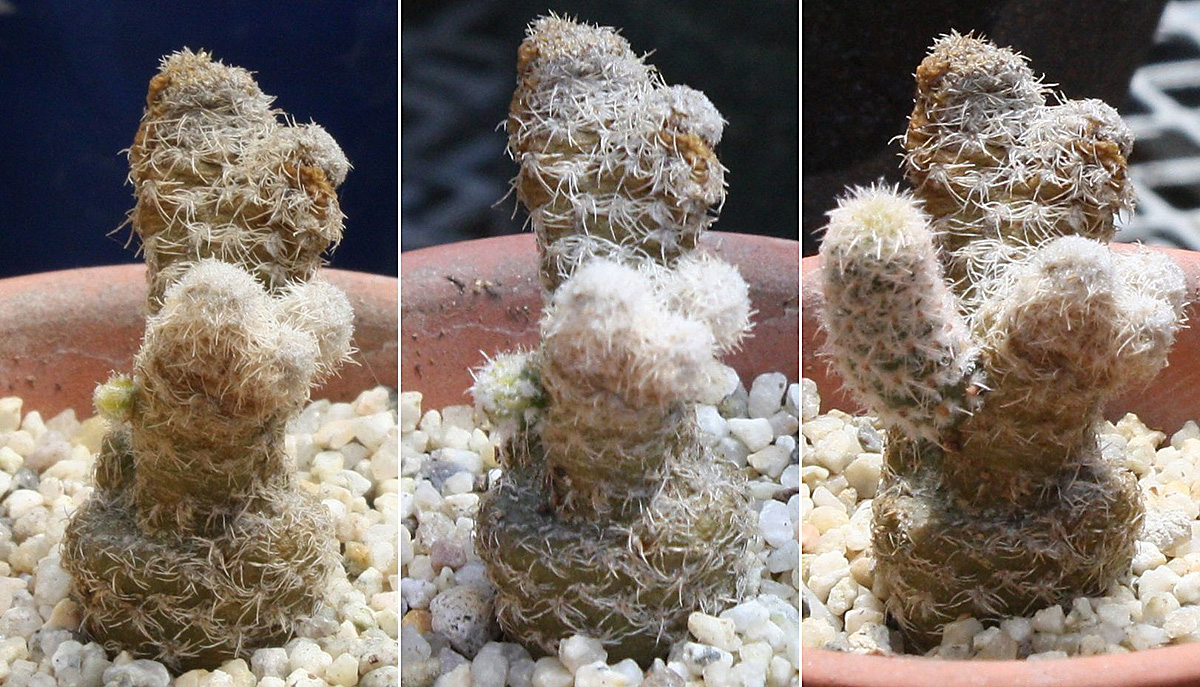
Based on Craig's experience with clavarioides, 1 new stem per year is what I would expect. I was happy enough with that, but what I saw last summer made me even happier -- 5/29 and 10/8:

This is a really nice story, and we'll add a new chapter for my 2018 review. In the meantime...
Craig was very kind about including a gift with the clavarioides he sent:

That's Cumulopuntia rossiana var. fuauxiana, also in a 2-inch terracotta pot. Although I freely admit that my general knowledge of the worldwide cactus scene is limited, Cumulopuntias are apparently under-appreciated among collectors. Not sure why, but it doesn't matter because he instinctively knew my tastes well enough to send a pleasant surprise I would enjoy. Since the plant didn't come with any roots to speak of, there was one question I needed to ask -- would it grow in a soil-less mix? If Cumulopuntias grow thin, scraggly Tephro-like roots, we might have a problem. Here's the answer on 5/14 and 9/17/16:

The view from above (6/4/16 on the left):

No problemo, soil-less it is! We have further confirmation from last year as tufts of new wool on 4/29 led to an excellent summer of growth (10/8):

Oddly enough, this is the only occasion when I didn't bother putting down a layer of gravel top dressing. The fuauxiana will need a bigger pot soon, so I'll have it on tap for the move to a glazed ceramic pot early next year -- top dressing included to keep residual pumice dust from floating up when the plant gets watered. Not that the white stuff on the pot means anything bad, it just looks messy, and I do have my standards!
We're finally in striking distance for wrapping up the 2017 review -- only 2 or 3 more installments to go!
Given this collector's particular fondness for miniatures, anything called "pygmaea" is likely to get my attention. I was on the lookout for a Rebutia to go with my heliosa, and M2G's online inventory of Rebutias made for an easy selection. Here it is settling in on 10/19/14, followed by the plant's 2nd summer under my care on 9/18/16:
The pygmaea came with lovely purple skin that slowly faded when it went from the blazing summertime heat of Arizona to the fairly temperate summers here in semi-coastal L.A. A bit disappointing, but the plant's attractive form and beautiful salmon-orange flowers more than make up for it. And we can't argue with the nice amount of new growth either -- in fact, the pygmaea was ready for a bigger pot, so it was repotting time again on 3/14/17. Since I started the plant in "dirty" mineral mix, we'll compare the roots on its date of arrival (left) with what they looked like coming out of the "dirty" mix (center and right):
Okay, not bad, although intuitive experience told me those roots could be growing a lot better in clean mix. Hitting the pygmaea's "reset button" in its new pot:
If I'm right about better root growth in clean mineral mix, we should see better new growth above-ground too. Now we'll put this to the test -- 3/14 and 10/8/17:
Do we see new pups poking their little heads out? Appears to be 2, but difficult to tell from the side. We'll try a bird's-eye view on 3/14 and 8/6:
Yep, 2 pups. Wait a minute, could there be more? Take the "after", turn it into a "before" and let's find out with an "after" on 10/8/17:
These results are really good, and while the species offsets more slowly than heliosa, new additions should be in the pygmaea's future.
2015 was the year when I started giving new cacti clean mineral mix right from the get-go. All these exhaustive "dirty" vs. clean mix discussions are now behind us (yay!), so the rest of the 2017 review won't be so bloody detailed (double yay!!!). With that in mind, here's a cactus from M2G which graced my collection on 5/16/15:
Cactuspedia has introduced me to lots and lots of interesting, wonderful species over the years. That's how I discovered 2 unusually striking Mamms -- luethyi and theresae. M. luethyi is a very slow grower (the reason why we'll find them only as grafted plants here in US nurseries). Although Miles Anderson had grafted luethyi in stock, the only way I'd buy one would be to degraft it and try to root the scion. IMO theresae is just as pretty, and because they grow well on their own roots, why take the chance on a degraft? Let's watch this gem grow over the course of 3 seasons -- 5/16 and 9/19/15, 9/17/16, and 10/8/17:
Everything about theresae is beautiful -- setting its first buds of 2017 on 4/29 and 5/8:
From bud to bloom on 6/1 and 6/2:
A threefer 2 days later:
M. theresae usually blooms in spring, although it can sometimes flower in summer as well. Here's mine going from buds to blooms on 8/3 and 8/17/17:
Small though it is, I've managed to push the collection's diversity "envelope" as I continue to seek out species I haven't tried growing before. My Tephros represent the Opuntioids, but I thought it might be nice if I found something interesting to represent another Opuntioid tribe. And thanks to Cactuspedia, I did -- Puna clavarioides. What a wonderfully odd, fascinating species, and who wouldn't be intrigued by a cactus called "dead man's fingers"? My talent for selecting difficult-to-find species came into play here, but if you've been in the hobby long enough to know the right people, your persistence usually pays off. In this case, it was Craig Fry of C and D Plants coming through for me again when he offered a few P. clavarioides for sale. I had him choose one for me, and here's what came out of the box on 12/18/15:
Just to give you some perspective, the plant is in a 2-inch (waterproofed) terracotta pot. Craig told me about the difficulty he had getting his clavarioides to root, so I knew I might be in for a challenge. I posted the first signs of progress on the forum in April 2016, prompting a few nice and helpful responses. I'll share that part of the story with you here. The story continued with more progress that summer, and you'll see the update here. Having zero experience with the species, 2 nuggets of info came in quite handy. One was from Dave W (referenced in the first link), as he suggested that when clavarioides is transplanted, it takes a year for the plant to establish its root system before it starts growing above-ground. You are correct, Dave! Then Craig said that new stem growth takes place in summer. Turns out that the clavarioides is actually ahead of schedule -- the view on 3/25 and 4/9/17:
Indeed, that's the beginning of a brand-new stem already! Next, we'll check in on the stem's growth rate -- 4/9, 4/20, and 5/29:
Based on Craig's experience with clavarioides, 1 new stem per year is what I would expect. I was happy enough with that, but what I saw last summer made me even happier -- 5/29 and 10/8:
This is a really nice story, and we'll add a new chapter for my 2018 review. In the meantime...
Craig was very kind about including a gift with the clavarioides he sent:
That's Cumulopuntia rossiana var. fuauxiana, also in a 2-inch terracotta pot. Although I freely admit that my general knowledge of the worldwide cactus scene is limited, Cumulopuntias are apparently under-appreciated among collectors. Not sure why, but it doesn't matter because he instinctively knew my tastes well enough to send a pleasant surprise I would enjoy. Since the plant didn't come with any roots to speak of, there was one question I needed to ask -- would it grow in a soil-less mix? If Cumulopuntias grow thin, scraggly Tephro-like roots, we might have a problem. Here's the answer on 5/14 and 9/17/16:
The view from above (6/4/16 on the left):
No problemo, soil-less it is! We have further confirmation from last year as tufts of new wool on 4/29 led to an excellent summer of growth (10/8):
Oddly enough, this is the only occasion when I didn't bother putting down a layer of gravel top dressing. The fuauxiana will need a bigger pot soon, so I'll have it on tap for the move to a glazed ceramic pot early next year -- top dressing included to keep residual pumice dust from floating up when the plant gets watered. Not that the white stuff on the pot means anything bad, it just looks messy, and I do have my standards!
We're finally in striking distance for wrapping up the 2017 review -- only 2 or 3 more installments to go!
If you just want photos without all the blather, please visit my Flickr gallery.
My location: Los Angeles, CA (Zone 10b)
My location: Los Angeles, CA (Zone 10b)
-
WayneByerly
- Posts: 1240
- Joined: Sun Apr 06, 2014 10:35 pm
- Location: In the north end of the Sequachee Valley, 65 miles north of Chattanooga Tennessee USA. Zone 7a
Re: A small collection: 2015 and beyond
Hi Steve
Its been a little while since I've talked to you. How you doing? I hope well! I find that I have rather missed being able to speak with someone as knowledgeable as you are.
I just finished looking at page 27 of your post. As I have something of a soft spot in my heart for the "clumpers", I was just fascinated by some of what I've seen there. Your posts are so phenomenally detailed! And so greatly appreciated!
With all the damage that was done to my Greenhouse by the tornado influenced storm that we had here, I've been doing a lot of repotting this year (2018). And based on your recommendations, I've gone with a nearly 100% inorganic mix.
The only thing different I have done is add a small % of Pine bark to my mix. In every single case where I have unpotted a cactus that had pine bark in its mix, I found that the roots cling tenaciously ... And I mean ferociously to the pine bark. If the roots do cling SO persistently, SO resolutely, SO staunchly, SO unswervingly... and so on, and so on, ad nauseum... Then the MUST be something about the bark that the cactus is profoundly interested in... something that the cactus wants!
I haven't found that the roots of any of my cacti cling so persistently to anything but pine bark! So I have added a small percentage, 10 to 15%, to my mix. For the inorganic component of my mix, I have two formulas.
The first is strictly experimental and the second is influenced by financial considerations. I paid good money for the High Grit components that the cacti were in and have no desire to just discard them, so I rinse out all of the fines and all of the organic material and keep the grit.
For my first mixture, I've used 66% Bonsai Block from BonsaiJack.com (a high temperature fired calcined clay) and 33% pumice for the inorganic components. I started out with a hundred percent Bonsai block, but found that it dried out too fast. So I added a bit of pumice to the mix to retain a little more moisture. Also, when you buy a bag of pumice, it comes in a variety of particle sizes, from Coarse Sand sized particles to quarter inch chunks. I rinsed both components thoroughly.
The second is a mix of the Bonsai block and the recovered Grit mentioned above.
So it's a little early yet observe any progress in their growth due to this new mixture. But observing the progress that yours have made I fully anticipate a great deal of improvement in both their general health, their growth rates, and their root health.
Be safe my friend... I'm very much enjoyed your post, and appreciate the pictures, as well as the instruction. Maybe especially the instruction!
Make the moral choice & always do what's right. Be a good example. Be part of the solution & make a contribution to society, or be part of the problem & end your life with nothing but regrets. Live a life you can be proud of! Zone 7a
-
WayneByerly
- Posts: 1240
- Joined: Sun Apr 06, 2014 10:35 pm
- Location: In the north end of the Sequachee Valley, 65 miles north of Chattanooga Tennessee USA. Zone 7a
Re: A small collection: 2015 and beyond
Steve
Do you recommend a "minimum" particle size for your growing medium? Some of the pumice/turface/misc grit particles of my mix can reach as small as about .5 mm or smaller. You think that's too small? Should I screen some of those smaller particles out?
Do you recommend a "minimum" particle size for your growing medium? Some of the pumice/turface/misc grit particles of my mix can reach as small as about .5 mm or smaller. You think that's too small? Should I screen some of those smaller particles out?
Make the moral choice & always do what's right. Be a good example. Be part of the solution & make a contribution to society, or be part of the problem & end your life with nothing but regrets. Live a life you can be proud of! Zone 7a
-
Steve Johnson
- Posts: 4593
- Joined: Thu Nov 03, 2011 4:44 am
- Location: Los Angeles, CA (Zone 10b)
Re: A small collection: 2015 and beyond
Hi Wayne,WayneByerly wrote: ↑Sat Aug 18, 2018 10:59 am Steve
Do you recommend a "minimum" particle size for your growing medium? Some of the pumice/turface/misc grit particles of my mix can reach as small as about .5 mm or smaller. You think that's too small? Should I screen some of those smaller particles out?
First of all, thank you so much for your appreciation of my work here at Member Topics -- I'm grateful for the opportunity to help our friends on the forum however I can. To answer your question, I highly recommend using a piece of metal or fiberglass window screen to dry-sift the mineral components before rinsing them thoroughly for use in a mix. The fiberglass screen I use has a mesh size of 1 mm x 1 mm, and whatever falls through the screen is waste that gets thrown away. Although we can't get away from a certain amount of fines, at least the dry-sifting keeps them down to a bare minimum. By the way -- when you rinse the mineral gravel, you can use the window screen, or a fine-mesh kitchen strainer as James (jp29) does here:

He doesn't bother with dry-sifting, so you may not need to do it either.
If you just want photos without all the blather, please visit my Flickr gallery.
My location: Los Angeles, CA (Zone 10b)
My location: Los Angeles, CA (Zone 10b)
-
WayneByerly
- Posts: 1240
- Joined: Sun Apr 06, 2014 10:35 pm
- Location: In the north end of the Sequachee Valley, 65 miles north of Chattanooga Tennessee USA. Zone 7a
Re: A small collection: 2015 and beyond
Hi Steve... thanks for your response. I appreciate your recommendations, and seriously take them to heart. I refuse to believe that I am unique in my appreciation of your efforts to help other members. So I hope you understand how greatly you are appreciated.Steve Johnson wrote: ↑Sun Aug 19, 2018 6:35 am ... The fiberglass screen I use has a mesh size of 1 mm x 1 mm...
So... nothing smaller than 1 mm. I do not dry sift my soil components, but wash them thoroughly hoping to rinse out any kind of fines.
Unfortunately, some material smaller than 1mm does remain behind in my "rinsing device" ( I use a kitchen strainer that I have dedicated to this purpose, exactly as you show in your reply
I guess I'm going to have to go through my remaining 5 gallons of soil components and rinse them again in order to dispense with as much of the fines as I can contrive... Perhaps I should do so in smaller batches!
.
Make the moral choice & always do what's right. Be a good example. Be part of the solution & make a contribution to society, or be part of the problem & end your life with nothing but regrets. Live a life you can be proud of! Zone 7a
-
Steve Johnson
- Posts: 4593
- Joined: Thu Nov 03, 2011 4:44 am
- Location: Los Angeles, CA (Zone 10b)
Re: A small collection: 2015 and beyond
That's what I do -- labor-intensive, but I firmly believe that putting in the time and effort to do the job right pays off over the long haul.
If you just want photos without all the blather, please visit my Flickr gallery.
My location: Los Angeles, CA (Zone 10b)
My location: Los Angeles, CA (Zone 10b)
-
Steve Johnson
- Posts: 4593
- Joined: Thu Nov 03, 2011 4:44 am
- Location: Los Angeles, CA (Zone 10b)
2017 End-of-summer review (Part 14)
When I came down with "cactus fever" many years ago, I had to get used to the fact that casualties would come with the territory. Back then, I killed more plants than I'd care to think about, and all due to sheer ignorance. Sure learned a lot since I got the current collection going in 2011 -- while casualties are an inevitable part of the grower's experience, I've learned as much from my losses as I have from my wins.
One cactus from my first collection that still haunts me is a beautiful Melocactus matanzanus I found at a very unlikely place in the '80s -- a local supermarket! As I mentioned in Part 12, the species has been my hands-down favorite Melo ever since, and I was thrilled to find out that the California Cactus Center had matanzanus available for sale in July 2011. Melos definitely aren't for beginners, which I came to find out when I made the newbie mistake of treating the matanzanus like the rest of my cacti -- no water at all in winter. Dry winters are fine for desert cacti and juvenile Melocactus, but once a Melo starts growing its cephalium, the plant requires light watering in winter to keep the roots alive for the next growing season. By the time I discovered that I made this mistake, I tried everything I could to save the plant, but it was too late and the poor thing died a long, slow death. At least I learned from the experience, so I was ready to get back on the saddle with another shot at growing a matanzanus.
When I visited C and D Plants in March 2014, Craig Fry set me up with a really nice one -- here it is with the Frailea grahliana you saw in Part 12:

I did so well with the matanzanus over the course of 2014 and '15, as I nailed it with everything including the right winter watering care. I moved the plant from a terracotta Azalea pot to a deeper glazed ceramic pot in February 2015 -- great idea, or so I thought until the miscalcuation cost me another lovely matanzanus the following winter. This time I knew exactly what I did wrong, and the detailed post you see here is quite instructive. In spite of the fact that the species is rather popular, I couldn't find matanzanus from any of my preferred sources. Casting a wider net, I contacted Desert Creations in Northridge CA, and luckily the good people there told me that they'd have a few just in time for the Sunset Succulent Society's show and sale on the weekend of 4/30-5/1/16. I made a beeline for the DC table that Saturday morning, and here's what came home with me:
The glazed ceramic pot I found at the show is pretty much perfect for the matanzanus, and the Turb you see here was another lucky find we'll discuss shortly. Other engagements kept me away from being able to repot the new DC cacti immediately, so repotting time had to wait for 5/8:
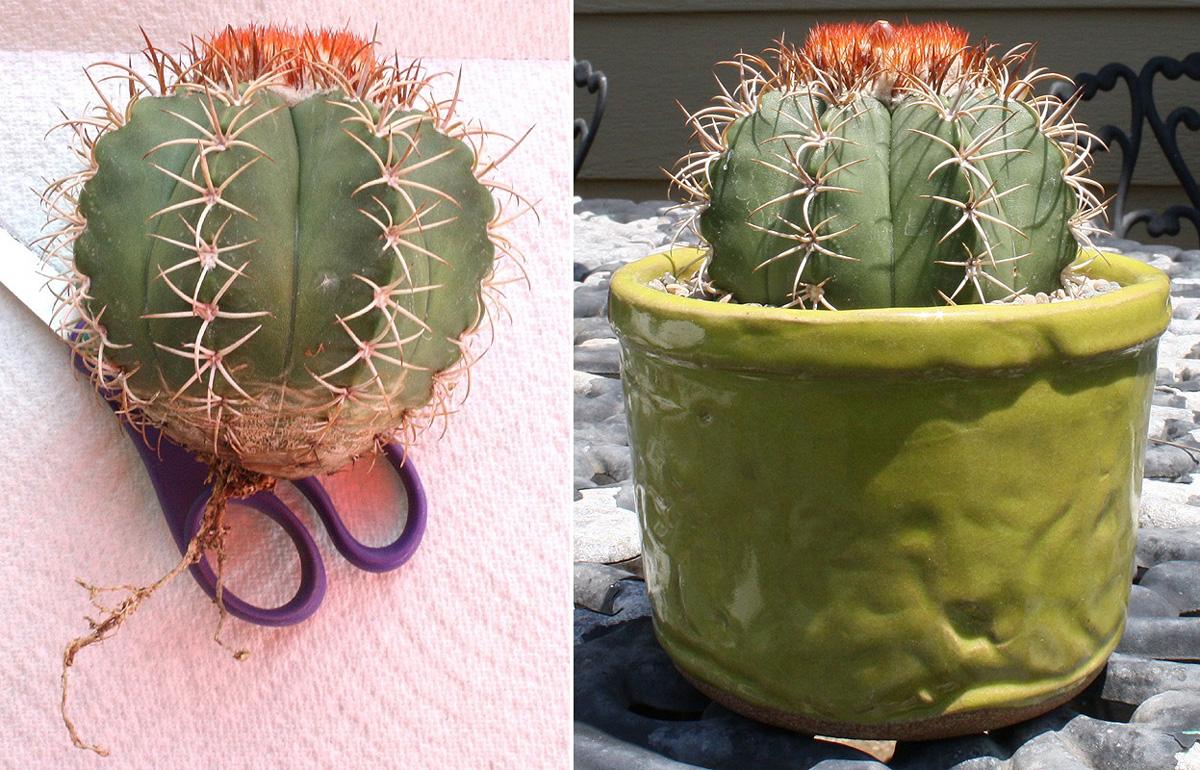
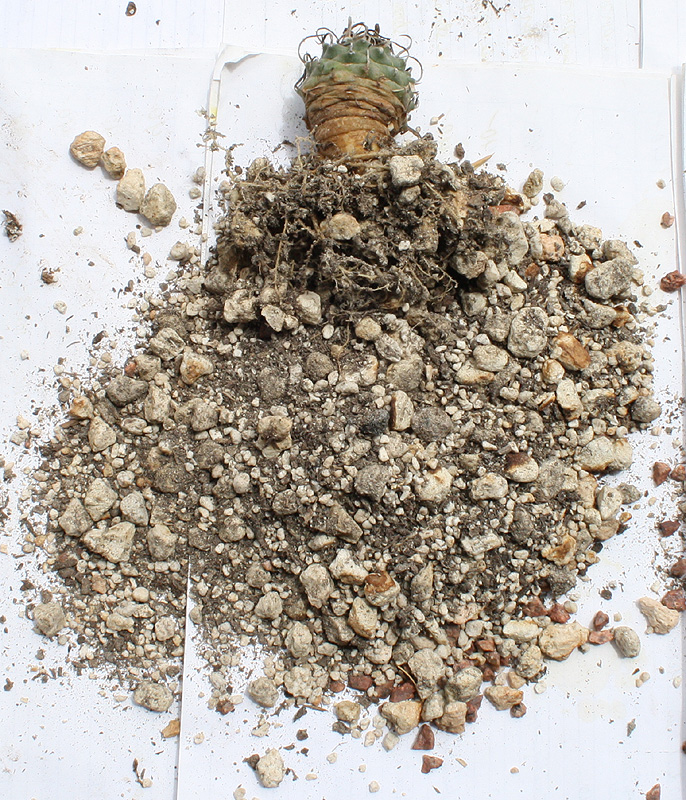
I was disappointed by the rich, wet mess that came out of the nursery pot. However, the matanzanus went straight from the wholesaler to DC's sales table, so the DC folks wouldn't have had enough time to do anything about it anyway -- the thin scraggly roots I got were a reflection only on the wholesaler's obviously bad practice. Okay, not much to work with, and what we're trying to do is grow a healthy new root system from what we have. While conventional wisdom says that it's almost impossible to do on an adult Melo, I came up with an effective strategy that says otherwise, and we have proof in the pudding on 5/30 and 9/17/16:

The view from above on 6/11 and 9/17/16:

And what is the strategy? I'll share it with y'all at a later date. In the meantime, here's a look at some nice cephalium growth going from 9/17/16 to 10/1/17:


The matanzanus is still with me, and you'll see it again in the 2018 review. If I manage to hold onto the plant for more than 3 years, it'll be quite an accomplishment!
Sad though it is to lose cacti, I'm more philosophical about losses than I was in my younger days. And because limited growing space comes at more of a premium when the collection has to be small, I've found that practicality keeps my mind moving ahead as I consider what I can do with the empty spots left behind. In some cases, I'll replace a dead plant with another one of the same species. In others, I'll use the spots vacated by ex-cacti as opportunities for trying species I haven't grown before. The following is a case of the former...
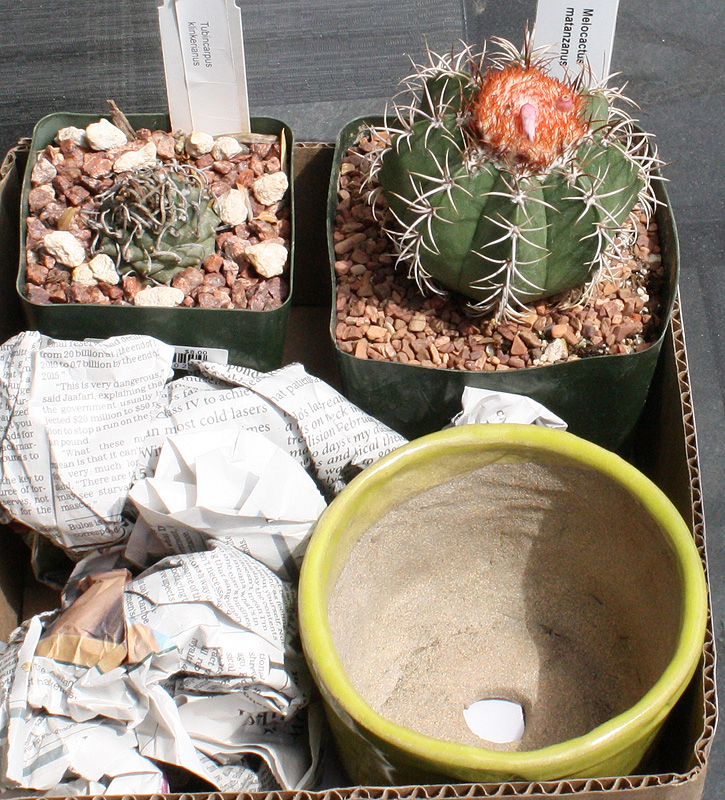
When I went to the CCC for my first big buy in June 2011, I found a Turbinicarpus klinkerianus that came from Woody Minnich's original Cactus Data Plants operation in Little Rock CA. The plant was already old when I got it, and this was my first time seeing a cactus die of old age as the klinkerianus' health finally gave out in the winter of 2016. Given its status as a Minnich "legacy" plant, it was a tough loss to take. But I did enjoy klinkerianus enough to look for another one, and that's the lucky find I snagged from DC's table at the Sunset show. Here's what came out of their nursery pot on 5/7/16:
Unlike what they got from their matanzanus wholesaler, this is good growing Desert Creations-style -- nice, lean mix, and we can't argue with the healthy roots going into my pot:
There's nothing leaner than pure, clean mineral mix, so we'll find out if the new klinkerianus approves of my methods -- 9/24/16 and 9/27/17:


Yep, it approves! The species is a fairly prolific bloomer in spring and summer -- usually 1 or 2 at a time, but here's a very nice "threefer" on 8/26/17:
Subtle, yet beautiful colors being displayed on 9/30/17:


I suspect that Woody's old klinkerianus might've been a habitat plant. If I'm correct, my nursery-grown klinkerianus from DC is producing the kind of vigor we would never get out of one being taken from the wild. By the way -- in case you didn't already guess, Desert Creations is now on my list of preferred sources!
Next up, a case of the latter...
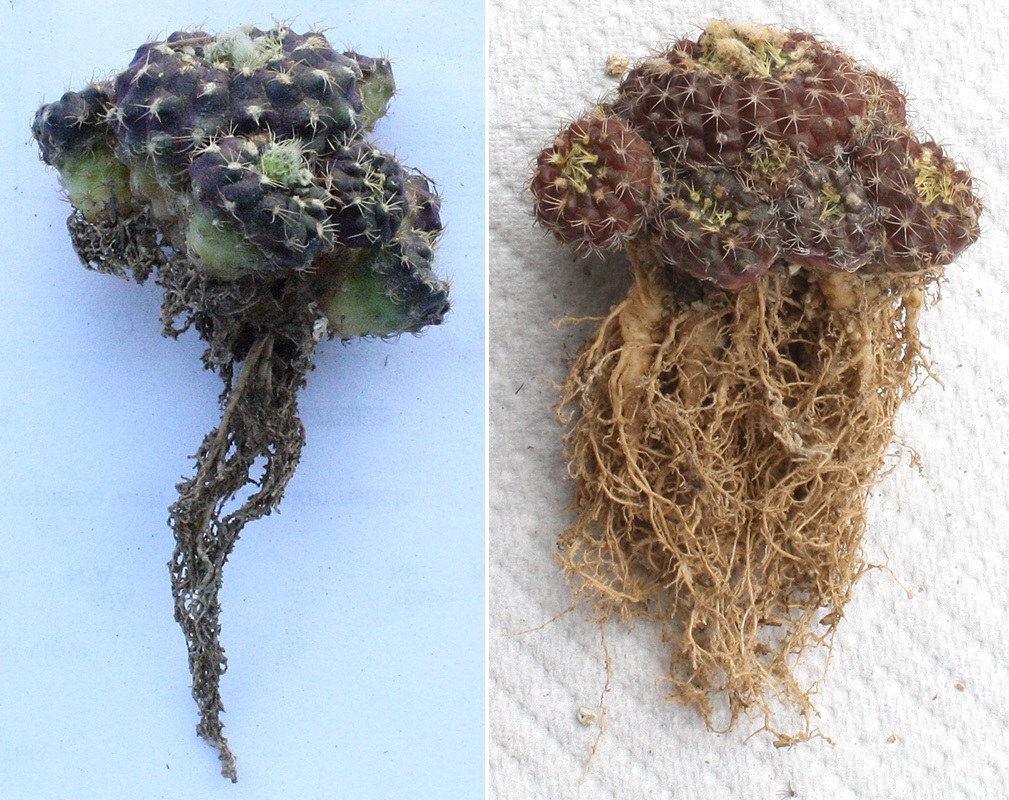
Hmmmm, what genera haven't I grown before? Here's one -- Parodia, and when I went to Cactuspedia's Parodia page, I glommed onto P. subterranea. (By the way, the species is also found in cultivation as Notocactus occultus.) I found one on eBay, and I was pleased to know that I'd be getting it from my friend Kyle Williams of Kyle's Plants. The new subterranea on 7/30/16:

The view on 9/18/16 and 9/23/17:


The subterranea has proven to be a reliable bloomer, and its colorful flowers are a sight to behold. I'll include new flower pics when the plant comes up again for my 2018 review.
My track record with Echinocereus isn't exactly stellar. First, a couple of E. rubispinus from the CCC went to the great compost heap in the sky before the one I got from CoronaCactus Nursery became the absolute winner we reviewed in Part 5. The rubispinus needed a next-door neighbor, so I went to CCN again for a lovely E. pectinatus 'Coahuila' I purchased in July 2013. The plant went nowhere in 2014, and unpotting revealed serious root loss. Unfortunately I wasn't aware of the "dirty" mix problem back then, so we'll chalk this up to excessive DG fines in the mix. (I could've tried regrowing the roots, but my track record with that hadn't been good either.) With the "dirty" mix problem resolved in 2015, I went to the Miles' To Go website and selected an equally attractive E. viridiflorus ssp. viridiflorus which arrived and got repotted on 5/16/15. Everything seemed to be fine until I saw this about 4 months later:
What the heck happened? It was the weirdest thing -- a hot September, nothing unusual about that. Add a touch of summer rain early in the month, and I guess the combination was simply bad timing for a viridiflorus that was still in the process of establishing. Yeah, I could've surgically removed the pup to try and save the plant, but given my lack of talent for rooting cacti, I decided to write the whole thing off. I kept the spot open for another Echinocereus, not being in any particular hurry to find a new neighbor for my rubispinus. Miles is good about rotating his inventory, so I figured that I'd eventually find something more interesting on his Echinocereus page. My patience was rewarded with this on 8/27/16:

Ooh, way more interesting -- E. viridiflorus canus. There wasn't enough time left in the growing season to expect much, so our first progress report on the canus begins with this -- the first signs of new spring growth on 3/17 and 4/1/17:

The plant in its first full growing season under my care -- 3/17 and 9/17/17:

At the end of summer 2017 -- the canus flanked by my rubispinus and the 2011 "veteran" Astrophytum myriostigma:

A good start, but if you think that's nice, wait until you see what the "hairy dog" looks like at the end of this summer.
I'll end today's post with another cactus from M2G, also received and potted on 8/27/16:

That's Eriosyce napina ssp. lembckei var. duripulpa -- what a mouthful! Here it is on 9/25/16 and 10/1/17:

The duripulpa is doing really well, and the plant produced its very first flower this year. I got the bud on camera, but unfortunately I couldn't be there to capture the wide-open flower. I'll save what I did get for the 2018 end-of-summer review -- it's almost that time again, friends! Before we get there, I'll have just one more post to finally wrap up 2017.
One cactus from my first collection that still haunts me is a beautiful Melocactus matanzanus I found at a very unlikely place in the '80s -- a local supermarket! As I mentioned in Part 12, the species has been my hands-down favorite Melo ever since, and I was thrilled to find out that the California Cactus Center had matanzanus available for sale in July 2011. Melos definitely aren't for beginners, which I came to find out when I made the newbie mistake of treating the matanzanus like the rest of my cacti -- no water at all in winter. Dry winters are fine for desert cacti and juvenile Melocactus, but once a Melo starts growing its cephalium, the plant requires light watering in winter to keep the roots alive for the next growing season. By the time I discovered that I made this mistake, I tried everything I could to save the plant, but it was too late and the poor thing died a long, slow death. At least I learned from the experience, so I was ready to get back on the saddle with another shot at growing a matanzanus.
When I visited C and D Plants in March 2014, Craig Fry set me up with a really nice one -- here it is with the Frailea grahliana you saw in Part 12:
I did so well with the matanzanus over the course of 2014 and '15, as I nailed it with everything including the right winter watering care. I moved the plant from a terracotta Azalea pot to a deeper glazed ceramic pot in February 2015 -- great idea, or so I thought until the miscalcuation cost me another lovely matanzanus the following winter. This time I knew exactly what I did wrong, and the detailed post you see here is quite instructive. In spite of the fact that the species is rather popular, I couldn't find matanzanus from any of my preferred sources. Casting a wider net, I contacted Desert Creations in Northridge CA, and luckily the good people there told me that they'd have a few just in time for the Sunset Succulent Society's show and sale on the weekend of 4/30-5/1/16. I made a beeline for the DC table that Saturday morning, and here's what came home with me:
The glazed ceramic pot I found at the show is pretty much perfect for the matanzanus, and the Turb you see here was another lucky find we'll discuss shortly. Other engagements kept me away from being able to repot the new DC cacti immediately, so repotting time had to wait for 5/8:
I was disappointed by the rich, wet mess that came out of the nursery pot. However, the matanzanus went straight from the wholesaler to DC's sales table, so the DC folks wouldn't have had enough time to do anything about it anyway -- the thin scraggly roots I got were a reflection only on the wholesaler's obviously bad practice. Okay, not much to work with, and what we're trying to do is grow a healthy new root system from what we have. While conventional wisdom says that it's almost impossible to do on an adult Melo, I came up with an effective strategy that says otherwise, and we have proof in the pudding on 5/30 and 9/17/16:
The view from above on 6/11 and 9/17/16:
And what is the strategy? I'll share it with y'all at a later date. In the meantime, here's a look at some nice cephalium growth going from 9/17/16 to 10/1/17:
The matanzanus is still with me, and you'll see it again in the 2018 review. If I manage to hold onto the plant for more than 3 years, it'll be quite an accomplishment!
Sad though it is to lose cacti, I'm more philosophical about losses than I was in my younger days. And because limited growing space comes at more of a premium when the collection has to be small, I've found that practicality keeps my mind moving ahead as I consider what I can do with the empty spots left behind. In some cases, I'll replace a dead plant with another one of the same species. In others, I'll use the spots vacated by ex-cacti as opportunities for trying species I haven't grown before. The following is a case of the former...
When I went to the CCC for my first big buy in June 2011, I found a Turbinicarpus klinkerianus that came from Woody Minnich's original Cactus Data Plants operation in Little Rock CA. The plant was already old when I got it, and this was my first time seeing a cactus die of old age as the klinkerianus' health finally gave out in the winter of 2016. Given its status as a Minnich "legacy" plant, it was a tough loss to take. But I did enjoy klinkerianus enough to look for another one, and that's the lucky find I snagged from DC's table at the Sunset show. Here's what came out of their nursery pot on 5/7/16:
Unlike what they got from their matanzanus wholesaler, this is good growing Desert Creations-style -- nice, lean mix, and we can't argue with the healthy roots going into my pot:
There's nothing leaner than pure, clean mineral mix, so we'll find out if the new klinkerianus approves of my methods -- 9/24/16 and 9/27/17:
Yep, it approves! The species is a fairly prolific bloomer in spring and summer -- usually 1 or 2 at a time, but here's a very nice "threefer" on 8/26/17:
Subtle, yet beautiful colors being displayed on 9/30/17:
I suspect that Woody's old klinkerianus might've been a habitat plant. If I'm correct, my nursery-grown klinkerianus from DC is producing the kind of vigor we would never get out of one being taken from the wild. By the way -- in case you didn't already guess, Desert Creations is now on my list of preferred sources!
Next up, a case of the latter...
Hmmmm, what genera haven't I grown before? Here's one -- Parodia, and when I went to Cactuspedia's Parodia page, I glommed onto P. subterranea. (By the way, the species is also found in cultivation as Notocactus occultus.) I found one on eBay, and I was pleased to know that I'd be getting it from my friend Kyle Williams of Kyle's Plants. The new subterranea on 7/30/16:
The view on 9/18/16 and 9/23/17:
The subterranea has proven to be a reliable bloomer, and its colorful flowers are a sight to behold. I'll include new flower pics when the plant comes up again for my 2018 review.
My track record with Echinocereus isn't exactly stellar. First, a couple of E. rubispinus from the CCC went to the great compost heap in the sky before the one I got from CoronaCactus Nursery became the absolute winner we reviewed in Part 5. The rubispinus needed a next-door neighbor, so I went to CCN again for a lovely E. pectinatus 'Coahuila' I purchased in July 2013. The plant went nowhere in 2014, and unpotting revealed serious root loss. Unfortunately I wasn't aware of the "dirty" mix problem back then, so we'll chalk this up to excessive DG fines in the mix. (I could've tried regrowing the roots, but my track record with that hadn't been good either.) With the "dirty" mix problem resolved in 2015, I went to the Miles' To Go website and selected an equally attractive E. viridiflorus ssp. viridiflorus which arrived and got repotted on 5/16/15. Everything seemed to be fine until I saw this about 4 months later:
What the heck happened? It was the weirdest thing -- a hot September, nothing unusual about that. Add a touch of summer rain early in the month, and I guess the combination was simply bad timing for a viridiflorus that was still in the process of establishing. Yeah, I could've surgically removed the pup to try and save the plant, but given my lack of talent for rooting cacti, I decided to write the whole thing off. I kept the spot open for another Echinocereus, not being in any particular hurry to find a new neighbor for my rubispinus. Miles is good about rotating his inventory, so I figured that I'd eventually find something more interesting on his Echinocereus page. My patience was rewarded with this on 8/27/16:
Ooh, way more interesting -- E. viridiflorus canus. There wasn't enough time left in the growing season to expect much, so our first progress report on the canus begins with this -- the first signs of new spring growth on 3/17 and 4/1/17:
The plant in its first full growing season under my care -- 3/17 and 9/17/17:
At the end of summer 2017 -- the canus flanked by my rubispinus and the 2011 "veteran" Astrophytum myriostigma:
A good start, but if you think that's nice, wait until you see what the "hairy dog" looks like at the end of this summer.
I'll end today's post with another cactus from M2G, also received and potted on 8/27/16:
That's Eriosyce napina ssp. lembckei var. duripulpa -- what a mouthful! Here it is on 9/25/16 and 10/1/17:
The duripulpa is doing really well, and the plant produced its very first flower this year. I got the bud on camera, but unfortunately I couldn't be there to capture the wide-open flower. I'll save what I did get for the 2018 end-of-summer review -- it's almost that time again, friends! Before we get there, I'll have just one more post to finally wrap up 2017.
Last edited by Steve Johnson on Sat Sep 08, 2018 10:03 pm, edited 1 time in total.
If you just want photos without all the blather, please visit my Flickr gallery.
My location: Los Angeles, CA (Zone 10b)
My location: Los Angeles, CA (Zone 10b)
-
brixtertabun
- Posts: 145
- Joined: Mon Mar 14, 2016 6:53 pm
Re: A small collection: 2015 and beyond
Hi Steve,Steve Johnson wrote: ↑Sun Aug 19, 2018 6:35 amHi Wayne,WayneByerly wrote: ↑Sat Aug 18, 2018 10:59 am Steve
Do you recommend a "minimum" particle size for your growing medium? Some of the pumice/turface/misc grit particles of my mix can reach as small as about .5 mm or smaller. You think that's too small? Should I screen some of those smaller particles out?
First of all, thank you so much for your appreciation of my work here at Member Topics -- I'm grateful for the opportunity to help our friends on the forum however I can. To answer your question, I highly recommend using a piece of metal or fiberglass window screen to dry-sift the mineral components before rinsing them thoroughly for use in a mix. The fiberglass screen I use has a mesh size of 1 mm x 1 mm, and whatever falls through the screen is waste that gets thrown away. Although we can't get away from a certain amount of fines, at least the dry-sifting keeps them down to a bare minimum. By the way -- when you rinse the mineral gravel, you can use the window screen, or a fine-mesh kitchen strainer as James (jp29) does here:
He doesn't bother with dry-sifting, so you may not need to do it either.
What about the recommended maximum size? There is a shop that sells pumice with different grades: 1-3MM, M 3-6MM, L 6-10MM
-
Steve Johnson
- Posts: 4593
- Joined: Thu Nov 03, 2011 4:44 am
- Location: Los Angeles, CA (Zone 10b)
Re: A small collection: 2015 and beyond
Maximum grain size should be 6 mm. The 6-10 mm grade might be okay if you're using it for drainage in a soil-based mix, but way too big for a purely soil-less mix.brixtertabun wrote: ↑Sat Sep 08, 2018 4:19 pmWhat about the recommended maximum size? There is a shop that sells pumice with different grades: 1-3MM, M 3-6MM, L 6-10MM
If you just want photos without all the blather, please visit my Flickr gallery.
My location: Los Angeles, CA (Zone 10b)
My location: Los Angeles, CA (Zone 10b)
-
brixtertabun
- Posts: 145
- Joined: Mon Mar 14, 2016 6:53 pm
Re: A small collection: 2015 and beyond
Thanks! I'm just using pumice. I'll buy the 3-6 mm pumice then.Steve Johnson wrote: ↑Sat Sep 08, 2018 5:30 pmMaximum grain size should be 6 mm. The 6-10 mm grade might be okay if you're using it for drainage in a soil-based mix, but way too big for a purely soil-less mix.brixtertabun wrote: ↑Sat Sep 08, 2018 4:19 pmWhat about the recommended maximum size? There is a shop that sells pumice with different grades: 1-3MM, M 3-6MM, L 6-10MM