Shadehouse build

Do-it-yourself projects such as greenhouse or shadehouse builds and related topics.
User avatar
CoronaCactus
Posts: 10421
Joined: Thu May 24, 2007 6:16 pm
Location: Corona, California USA [Zone 10]
Contact:

Shadehouse build

Post by CoronaCactus »

Note: Edited from posts in this thread to put it all together into a single thread and to place it in this new section.


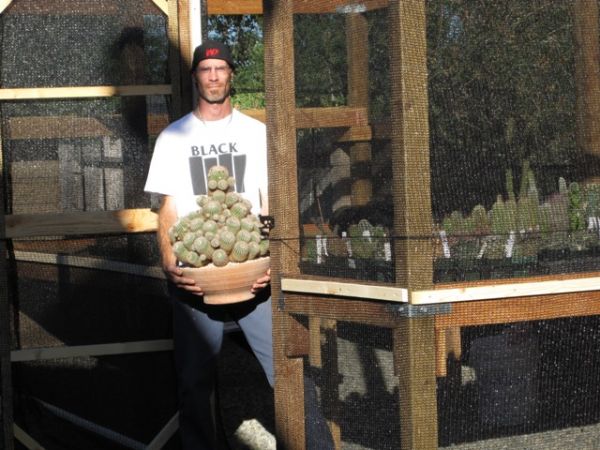
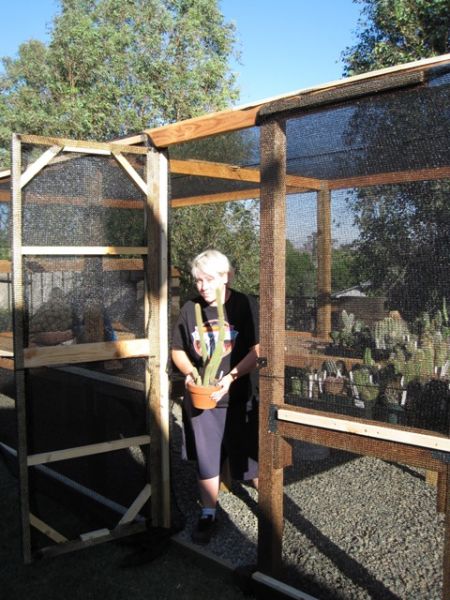
It's actually been a very long ongoing project. From the removal and relocating of all the plants in that garden area, to actually breaking ground and getting some sawdust flying...it's been 2 months. It was difficult to find places for all the rose bushes that came out of there. atleast 6 went in the ground and 5 more in pots. Other C&S plants are still awaiting homes. Soooo inbetween other life stuff, i've finally gotten to the point of calling it a shadehouse!

I'm posting all this here, hopefully, for the benefit of anybody thinking of building something similar. It may not be as easy as it may seem. Alot of physical labor is involved, as well as proper preparation for a long lasting structure. I'm also posting so you have a bunch of pics to look at to kill time if your bored ;)


9-28-2009

Removal of garden plants
Mainly just a whole bunch of rose bushes and a few C&S along the front border to be removed. The lanky and awkward wisteria and arbor was no easy task to move. The roots had gone through the drain holes making it a bear to get out. The drag across the yard wasn't any fun either... :roll: This is it, in its new home on the opposite side of the yard.
Image
Image
Image

Removal of grass!!!
Well, Jen had left me on my own for too long and i acted on one of those *stupid ideas* i get ;)
Image
Image

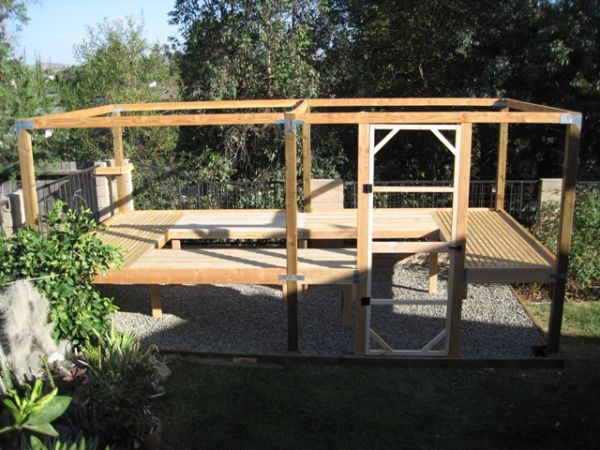
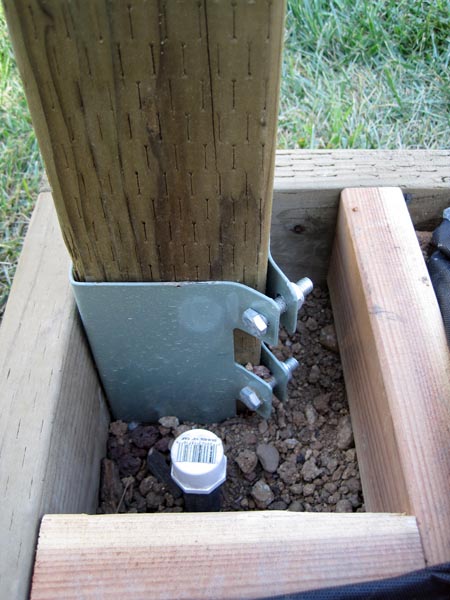
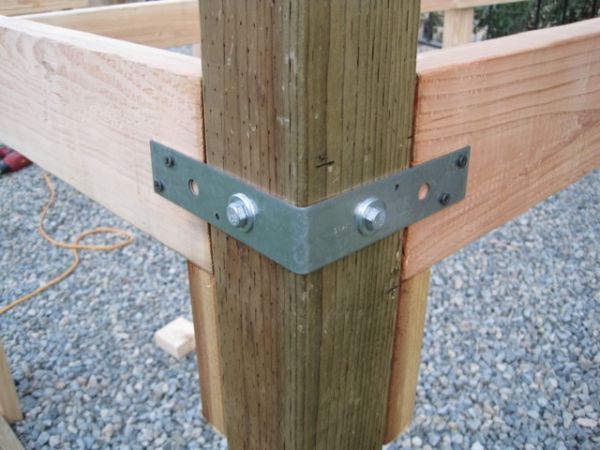
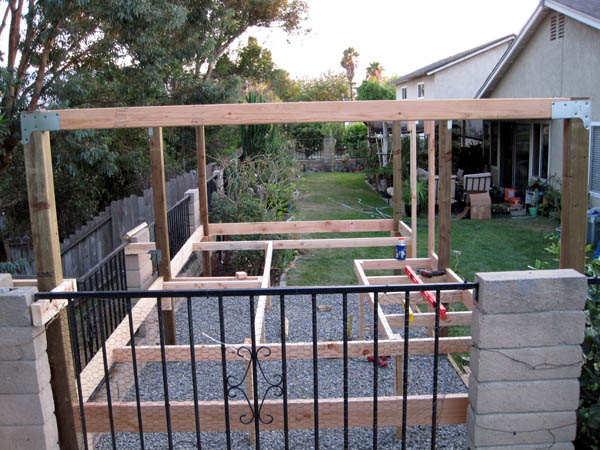
Installing the posts for the frame
Ok, so now were getting somewhere. This is the most important part of the project. Take the time to measure alot and double check everything. If the first post is not plum, the rest of the structure will also be outta whack. The 4x4 posts are set into metal brackets with 2 foot long blades that you pound into the ground. I thought this would be easier and/or better. Meh, it's marginal. The only advantage is if a post were to rot, break, crack, whatever, a new post could easily be put in its place by undoing 2 bolts.
Image
Image
Image

Leveling the ground, weedblocker fabric and gravel floor
Using the garden soil leftover from the greenhouse build last year, we filled in where the grass was. The area is not perfectly level, as by doing so would bring the soil level low enough down the wall to start to expose the footing. So it slopes by 3-5 inches. No biggie. I then applied an Ortho product (sorry forgot the name) but it's a ground clear chemical than kills/prevents growth for up to a year (so it claims) I didn't want to deal with any weeds or grass growing, so hopefully this along with the fabric will do the trick. 2 tractor scoops of 3/4 inch gravel was used for a 3 inch deep floor with a little bit left over.
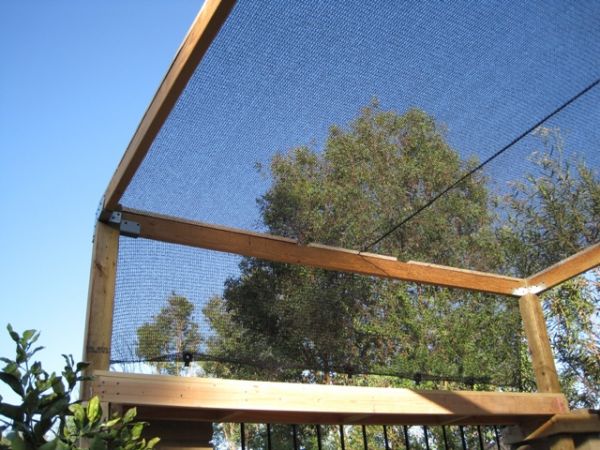
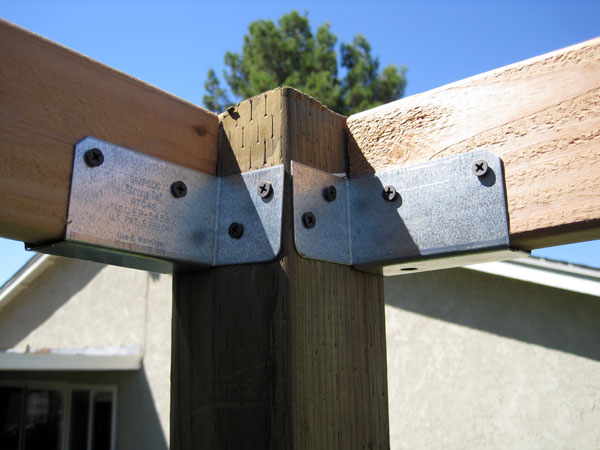
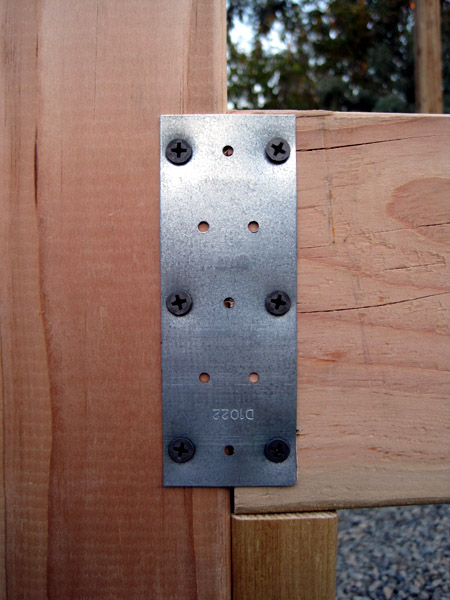
Image

Framing brackets
I used various metal brackets and stiffeners for the upper parts of the framing. It was easier to work with and came in real handy when working alone.
Image
Image
Image
Image
Image
Image

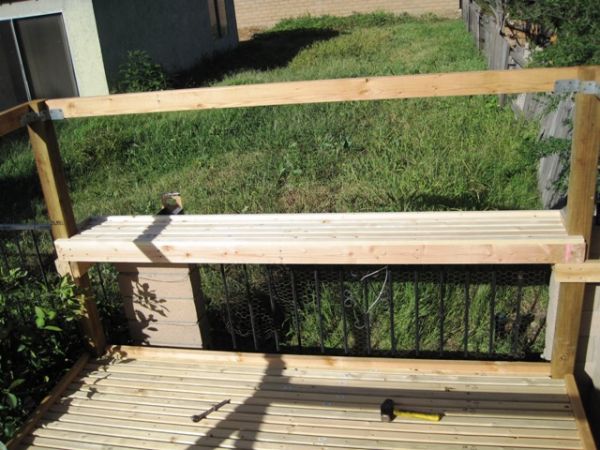
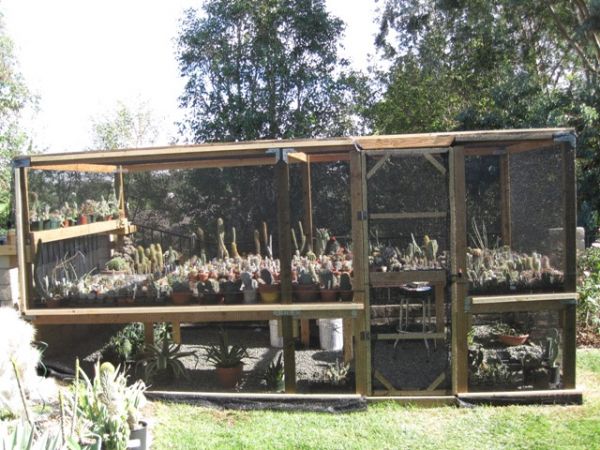
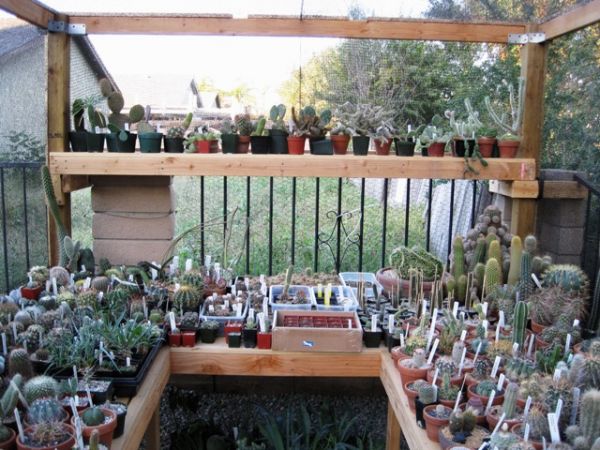
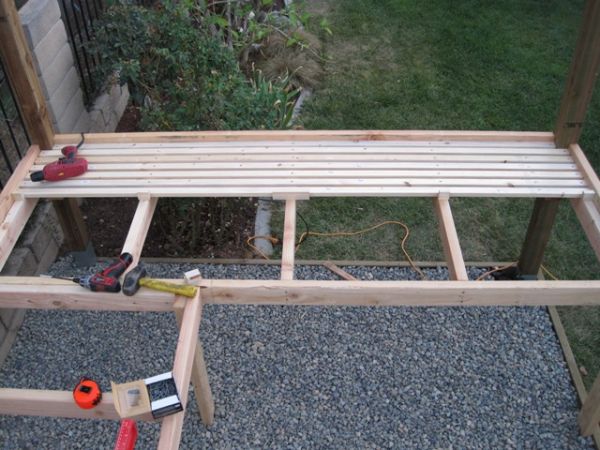
Benches/shelving/staging
Whatever you want to call them...they are the parts where the plants will go on ;)
I went with a 32 inch bench height. Kinda low for me, but not too high for Jenni. Allows me to lean over to the back and allows Jenni to see the back ;) 3 of the 4 sides are 36 iches deep, the door side is 30 inches deep. Allows for 30 inches of walkway. Enough to maneuver comfortably without fear of knocking plants over.

I also framed out a doorway. Why on the long side and not the short you ask? 2 reasons. 1) On the short side, i'd eventually constantly be attacked by rose bushes. 2) calculating the square footage, i get 1.5sq.ft. extra 8) As small as that is, the more space the better!
Image
Image
Image
Image
Image

Bench top slats
After using regular tables and plywood tops for benches in the greenhouse, i knew i had to use a different method. I've seen this slat method used in nurseries all over, so i went with it. My only concern is i have alot of small pots and they may tip if moved or whatever since the slats are only 1 5/8 inches wide. But i love the way it turned out and i think the small pots will be fine.

It's a long and tedious process. The slats need to be pre-drilled and cut to size. I then use the cut ends to act as spacers for each slat to ensure uniform spacing throughout. This method works great, just takes awhile. I managed this one 8x3 foot bench in about 2hrs tonight.

I used 2x6 lumber for the backings, as i wanted a lip to kinda act as a backstop for the pots.
Image
Image
Image
Image


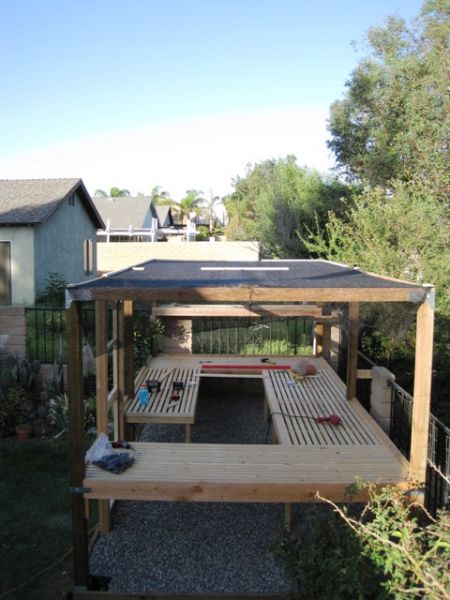
Well, thats as far as i've gotten, as of tonight...more bench slats tomorrow, maybe another small upper shelf along the short back wall, build the door and then the final step, the shadecloth!
User avatar
CoronaCactus
Posts: 10421
Joined: Thu May 24, 2007 6:16 pm
Location: Corona, California USA [Zone 10]
Contact:

Post by CoronaCactus »

10-5-2009
Shadehouse progress pics...

I need to wait for some help to get the cloth up on the sides, it was slightly challenging doing the roof alone in the wind 8)


Benches & Door complete
Image
Image

Standard gate hinges and latch.
Cheap, effective and won't rust. I put in a stopper trim along the inside of the latch side of the door frame to prevent the door swinging inwards and tearing out the hinges ;) It will open fully flat to the wall.
Image
Image
Image


Since this one bench end was exposed, i used a scrap peice to try and dress it up a bit as trim.
Image

Rear Shelf complete.
I offset the rear shelf outside the dimensions of the posts so it would never shade the lower bench. The way the house is positioned and the way the sun travels, it probably wouldn't have shaded it anyway, but i wanted to be sure!
Image
Image

Roof cloth complete
I decided to go with 2 pieces for the cloth. (40%) Figured it would be easier to install and i would not have to deal with any folds in the corners. The roof as one piece and then wrap the sides. It will go down as far as the bench tops. I think i might put some lattice from the benches to the ground to keep out the local critters.

I used more cut scraps from the slats to pinch down the cloth all along the framing. Despite the difficulty, i am quite happy how it came out. I managed to get it nice and tought without any stretch waves 8) I wasn't all that thrilled at first when i saw the big seam down the middle...but in the end it's no big deal and it helped me to center it when installing.
Image
Image
Image


10-21-2009

Ok, where was i.... oh yes shadehouse final pics! :)

Jen and i have been two sick peas in a pod but we managed to finish the shadehouse and move all the plants in...well, all the ones that fit in it ;)

Ceremonial pics
Image
Image

Complete with plants!
Image
Image
Image
Image
Image
Image
User avatar
Arzberger
Posts: 369
Joined: Fri May 02, 2008 2:47 pm
Location: Asuncion - Paraguay
Contact:

Post by Arzberger »

Very nice setup, Darryl.
Looks like hard work and very well done!
Congratulations!

Regards
Alex
User avatar
Andy_CT
Posts: 2101
Joined: Tue Jul 03, 2007 10:44 am
Location: Connecticut, USA

Post by Andy_CT »

Looks well built and way cool!! It would be the comedy of the year if I tried something like that :shock:
User avatar
dustin0352
Posts: 1303
Joined: Sat Apr 26, 2008 11:40 am
Location: East Coast Florida

Post by dustin0352 »

Awsome man! I wish I didnt have to worry about rain. Do you guys ever get heavy winds? Me being the paronoid freak is wondering if wind would blow the smaller plants off of the shelf that seems to be ontop of the fence. Or is wind something you cali dudes dont have to worry about either?


Darryl wrote = "Enough to maneuver comfortably without fear of knocking plants over."

Have you ever noticed that you can walk all over with out knocking anything over. The minute you bring a friend or family member (non cactiholic) out to show the greenhouse they charge through the place like a OX in a china store! :evil:
User avatar
CoronaCactus
Posts: 10421
Joined: Thu May 24, 2007 6:16 pm
Location: Corona, California USA [Zone 10]
Contact:

Post by CoronaCactus »

Thanks guys.

Dustin,
We do get some heavy winds with the Santa Ana's. Usually in winter. Yes, they can and have knocked plants over before. Infact last week i was looking out the window just in time to see Grusonia marenae fall and cholla slap a tray of seedlings...oh snap! :( Luckily it was a tray of columnars i had staked with skewers, no damage done :)
User avatar
Harriet
Posts: 3965
Joined: Wed May 13, 2009 3:04 pm
Location: Central Florida

Post by Harriet »

Did you use redwood? cedar? Doesn't look like pressure treated... I've never been able to find 1 by stock as straight and clean as the stuff you used for your shelf tops. Very nice shadehouse!
User avatar
CoronaCactus
Posts: 10421
Joined: Thu May 24, 2007 6:16 pm
Location: Corona, California USA [Zone 10]
Contact:

Post by CoronaCactus »

Redwood was kinda expensive. I used premium grade A 2x4's and 2x6's. The pressure treated is only used for the 6 main posts, the outer edge along the grass line and feet on all the legs for the benches inside. Basically anything that touches to ground.

Not sure what the slats are made of. It's pretty much all Home Depot had in that size. It'll all be subject to once a week waterings for 8-9 months a year, so i estimate a long enough life span. I used a lot of screws so nothing will warp :)
Tony
Posts: 10770
Joined: Mon Sep 26, 2005 2:56 am
Location: Chino, Ca, USA (zone 10)
Contact:

Post by Tony »

cholla slap
:lol:
Yeeouch!

It does get real windy here too Dustin, but not nearly as bad as Darrel and Buck have it I think.
Where I live here in the Chino valley, it stays a tad colder for longer periods then most other areas close by.
So I have a much more difficut time with frost than with wind.
Forget the dog...Beware of the plants!!!

Tony
User avatar
apacholek10
Posts: 374
Joined: Mon Aug 24, 2009 5:11 pm
Location: Independence, KY
Contact:

Post by apacholek10 »

That is awesome! Want to build one for me please?!
Anthony
User avatar
king_hedes
Posts: 903
Joined: Thu Sep 17, 2009 3:16 am
Location: Aransas Pass,TEXAS

Post by king_hedes »

thats a really nice lookin shade house
plant zone 9a
Matt Ivy
User avatar
jenni
Posts: 145
Joined: Thu Nov 13, 2008 10:20 pm
Location: corona, ca
Contact:

Post by jenni »

Notice the bar stool in the last picture? Guess where I find Darryl now all the time :D I will say that in the end it was worth sacrificing some of my lawn because now my cactus are in there too!!! (I have about a 6' section of claimed plants)
I've killed plants.
Tony
Posts: 10770
Joined: Mon Sep 26, 2005 2:56 am
Location: Chino, Ca, USA (zone 10)
Contact:

Post by Tony »

If I had that kind of room, I would move my recliner out there! :laughing6:
Forget the dog...Beware of the plants!!!

Tony
User avatar
Harriet
Posts: 3965
Joined: Wed May 13, 2009 3:04 pm
Location: Central Florida

Post by Harriet »

Stools and recliners are OK, but I'd like a shade house big enough for plants and working benches, AND a Margaritaville corner complete with hammock and a cool breeze...
daiv
Site Admin
Posts: 23625
Joined: Mon Aug 16, 2004 10:15 pm
Location: Long Prairie, MN
Contact:

Post by daiv »

Darryl,
This is a super post. Aside from sharing with us your awesome building skills and mind-blowing collection of plants, it will help lots of people with their own projects. Even those that don't sign up for the forum will no doubt benefit from this.

Thanks for taking the time to put it all together here.

Daiv
All Cacti are succulents, but not all succulents are Cacti
Post Reply